
The window
The window has five parts (steps 1, Frames, 2, Analyze, and 3, Stack, replace tool panel and canvas by a page of their own). The step bar at the top guides you through a typical astrophotography workflow; the other parts show what the open step needs.
| Part | What it does |
|---|---|
| Step bar | In the middle of the toolbar: the seven workflow steps 1 Frames, 2 Analyze, 3 Stack, 4 Linear, 5 Stretch, 6 Finish and 7 Export, see The workflow steps. |
| Tool panel | What the open step offers. In Linear, Stretch and Finish these are the step's modules, in the recommended order: open one to see its parameters, then click Apply or press ⌘Return. Return alone only confirms the value in a field. Only one module is open at a time. Frames, Analyze and Stack have no tool panel: they fill the whole window, see The Frames step, The Analyze step and The Stack step; Export the settings of the file, see The Export step. Drag the line between the panel and the image area to make the panel wider (up to about twice its width) or narrower again; a double click on the line goes back to the default width. Siderea remembers the width for all projects. |
| Canvas | The work area. Every image you open gets its own window on it, see Image windows. In a window the image is fitted when it opens; the pixel coordinates and values under the cursor are shown bottom left, the zoom controls bottom right. |
| History strip | A strip right of the canvas that you open with the History button in the toolbar, View → History or ⇧⌘H. It is the same in every step with a canvas (all but Frames, Analyze and Stack), see History and undo. |
| Status bar | Format, image size, number of history steps and whether Siderea is busy, all for the active image. Next to them: how much CPU and memory Siderea uses and how much disk space the open project and its linked frames take, see The status bar. |
Double-clicking an empty spot of the title bar or toolbar zooms or minimizes the window, as set in System Settings under "Double-click a window's title bar to".
The workflow steps
The step bar in the middle of the toolbar lists the seven steps from raw frames to a finished file. The open step is highlighted, a finished step shows a check mark instead of its number. Click any step at any time: the order is a recommendation, not a requirement. The shortcuts are ⌥⌘1 to ⌥⌘7. In a narrow window only the open step shows its name. Siderea opens with the step that was open when you quit it last, the first time with Frames. The info button at the right end of the toolbar opens this help, and every step has a help button of its own (an info icon in the step's bar or at the top of its panel) that opens the part of this help that explains that step.
| Step | What you do there | Done when |
|---|---|---|
| 1 Frames | Add frames, sort them into groups and sessions and leave frames out. The step fills the window, see The Frames step. | the project has lights |
| 2 Analyze | Measure the lights, find the bad ones (clouds, wind, tracking errors) and decide which stay in the stack. The step fills the window, see The Analyze step. | every light in the stack has a measurement |
| 3 Stack | Check what the project would stack, decide on masters, set the options and start the run. The step fills the window, see The Stack step. | a stack result is saved in the project or the open image is a stack |
| 4 Linear | Everything that should happen before stretching: Debayer (only for a single raw image), Crop, Rotate, Resample, Gradient Removal, Background Neutralization, Color Calibration. | a module of this step was applied to the open image |
| 5 Stretch | Make the image visible: Histogram Stretch, Arcsinh Stretch, Invert. | a module of this step was applied |
| 6 Finish | The final touches: Luminance Combine (only while a second image is open), Saturation, Green Removal, Noise Reduction, Unsharp Mask, Star Reduction. | a module of this step was applied |
| 7 Export | Save the image of the active window as a file: choose format, stretch, size, name and folder and look at the result first, see The Export step. | the open image was exported and has not changed since |
In the three processing steps the modules stand in the recommended order, each with its number. At the bottom of the panel the button Next: … opens the next step. Opening another step closes the open module. Modules and checkmarks of the processing steps refer to the image in the active window.
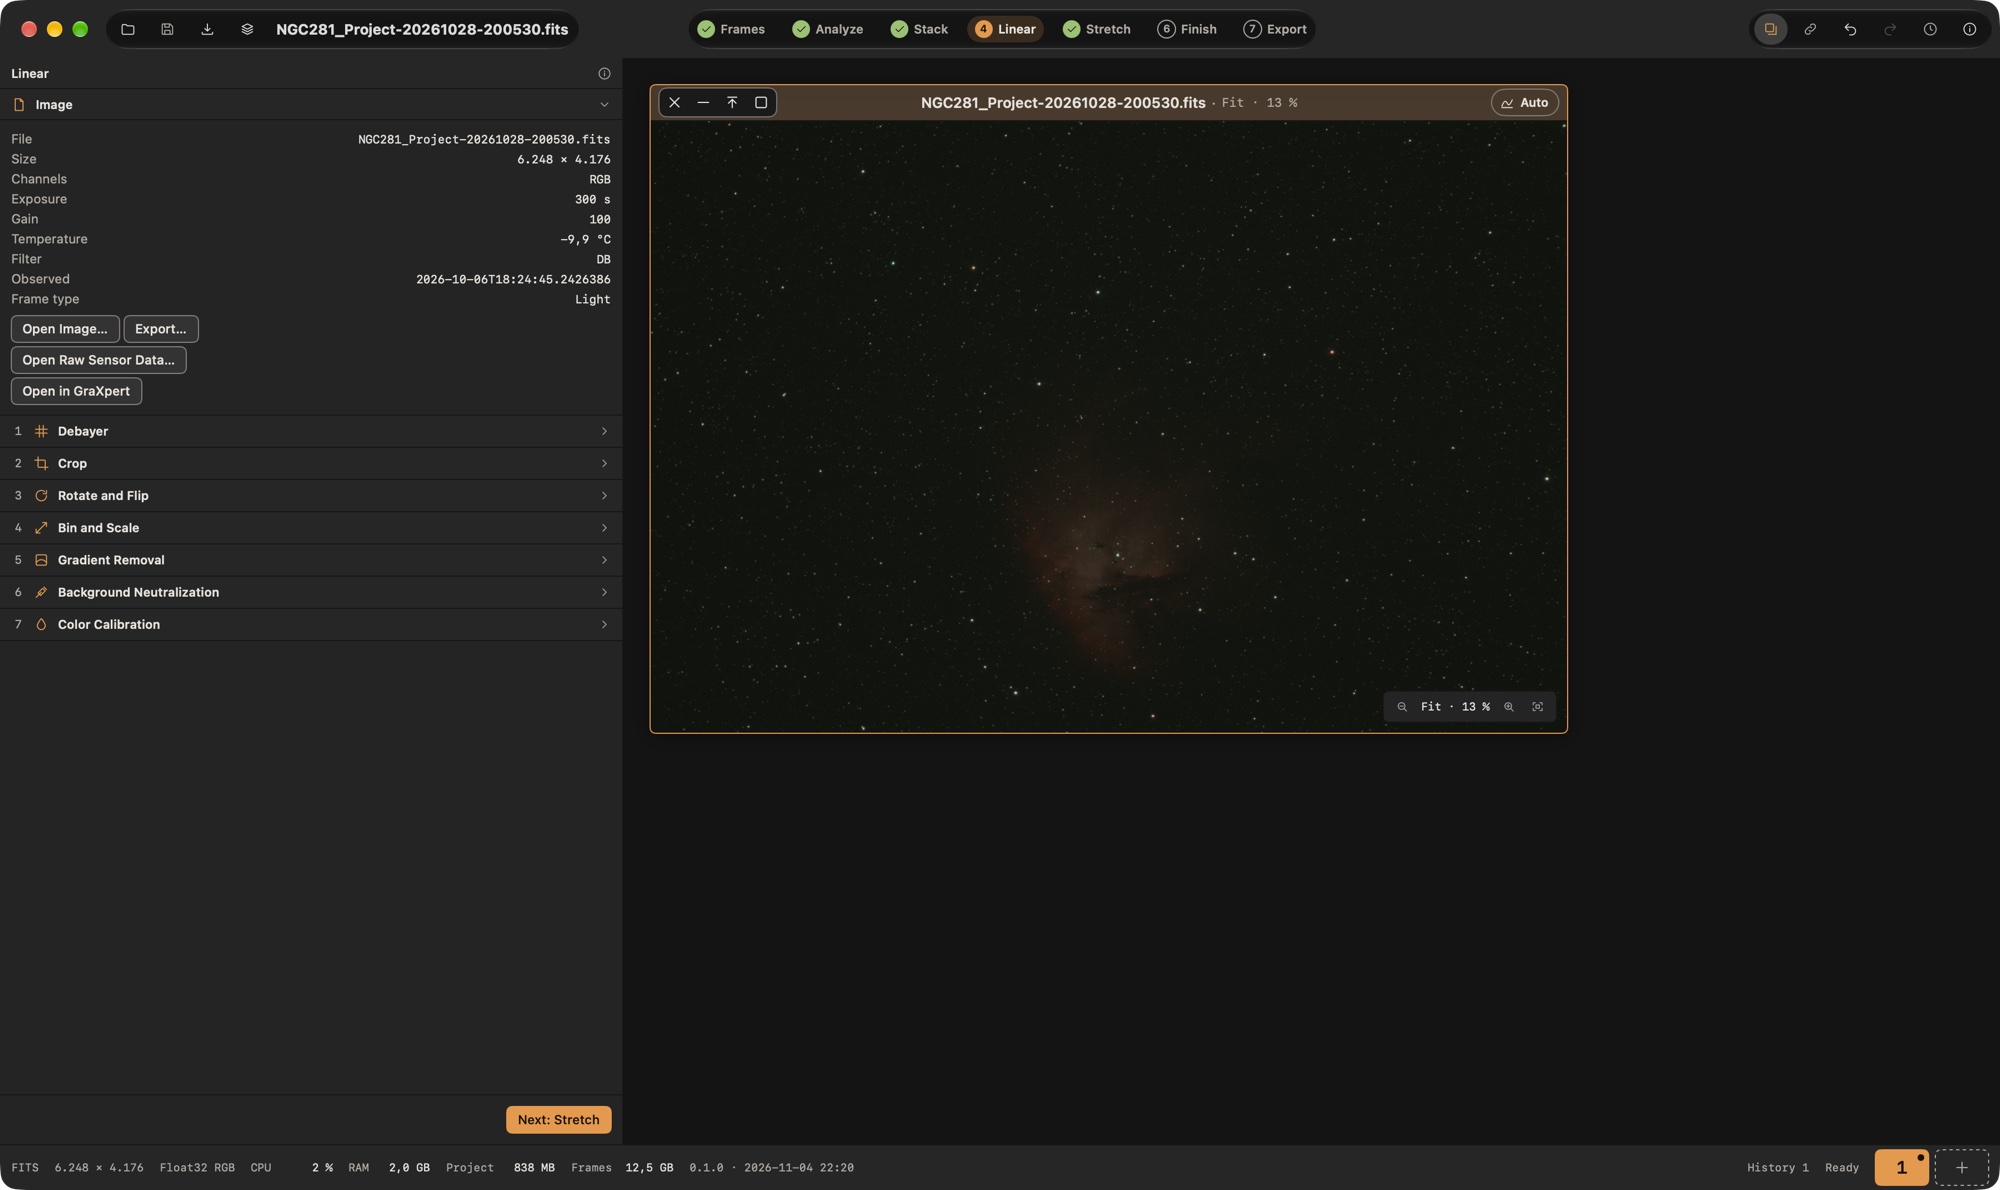
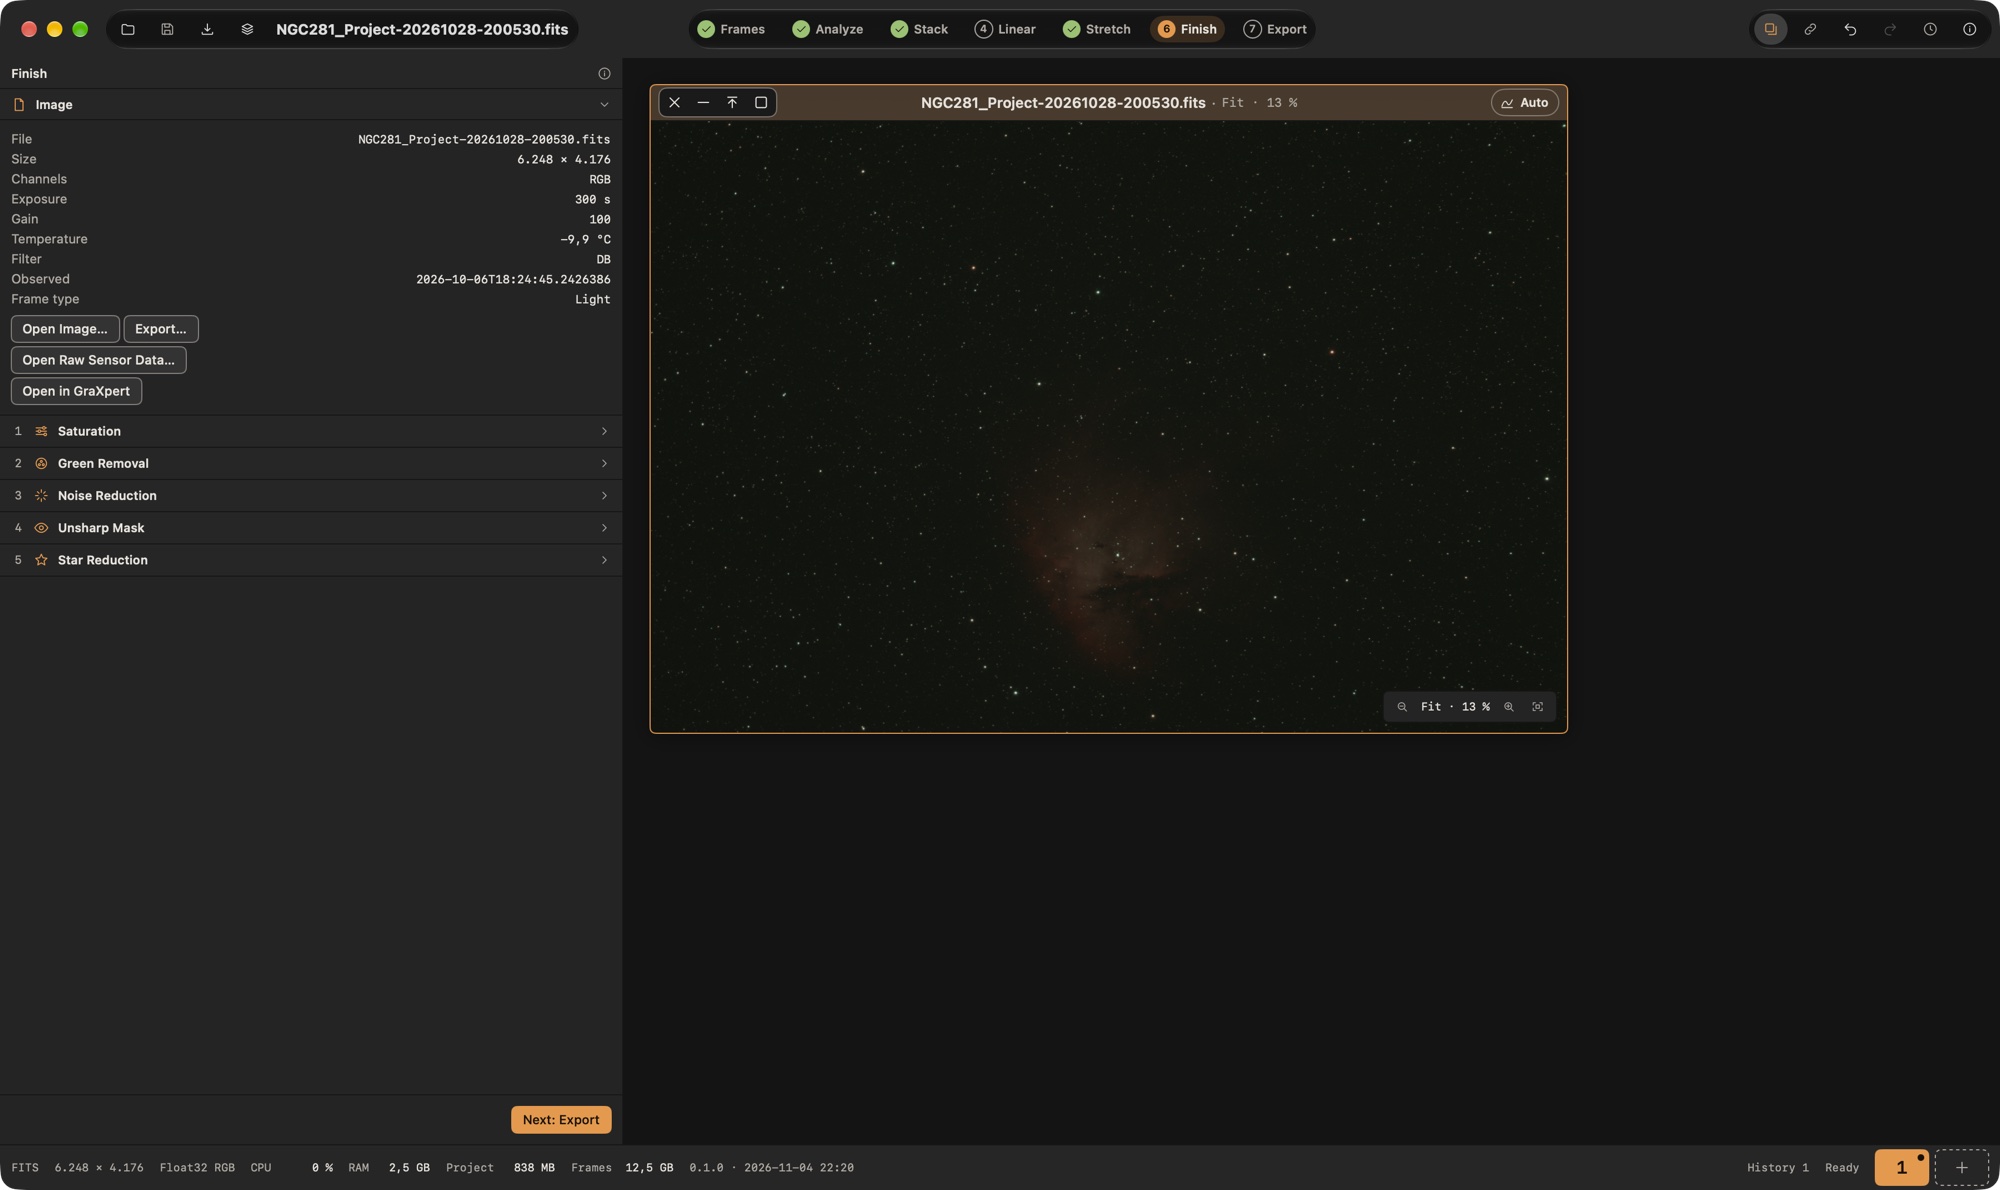
Editing a single image (without stacking) starts at step 4: open the image with Open, and leave Frames, Analyze and Stack alone. The Image section at the top of the panel of steps 4 to 6 shows the image on the canvas, see The Image section. Debayer is the first module of Linear for a raw image from a color camera.
The Export step
Step 7 Export writes the image of the active window as a file. The tool panel holds the settings; the image area shows the picture the file will contain, with the stretch and the size already applied, and below it the size in pixels, the format and the size of the file. The image windows are hidden while the step is open and come back when you open another step. Export… in the File menu, the Export button in the toolbar and the one in the Image section open this step (the menu item has the shortcut ⇧⌘E); the file is written with the Export button at the bottom of the panel.
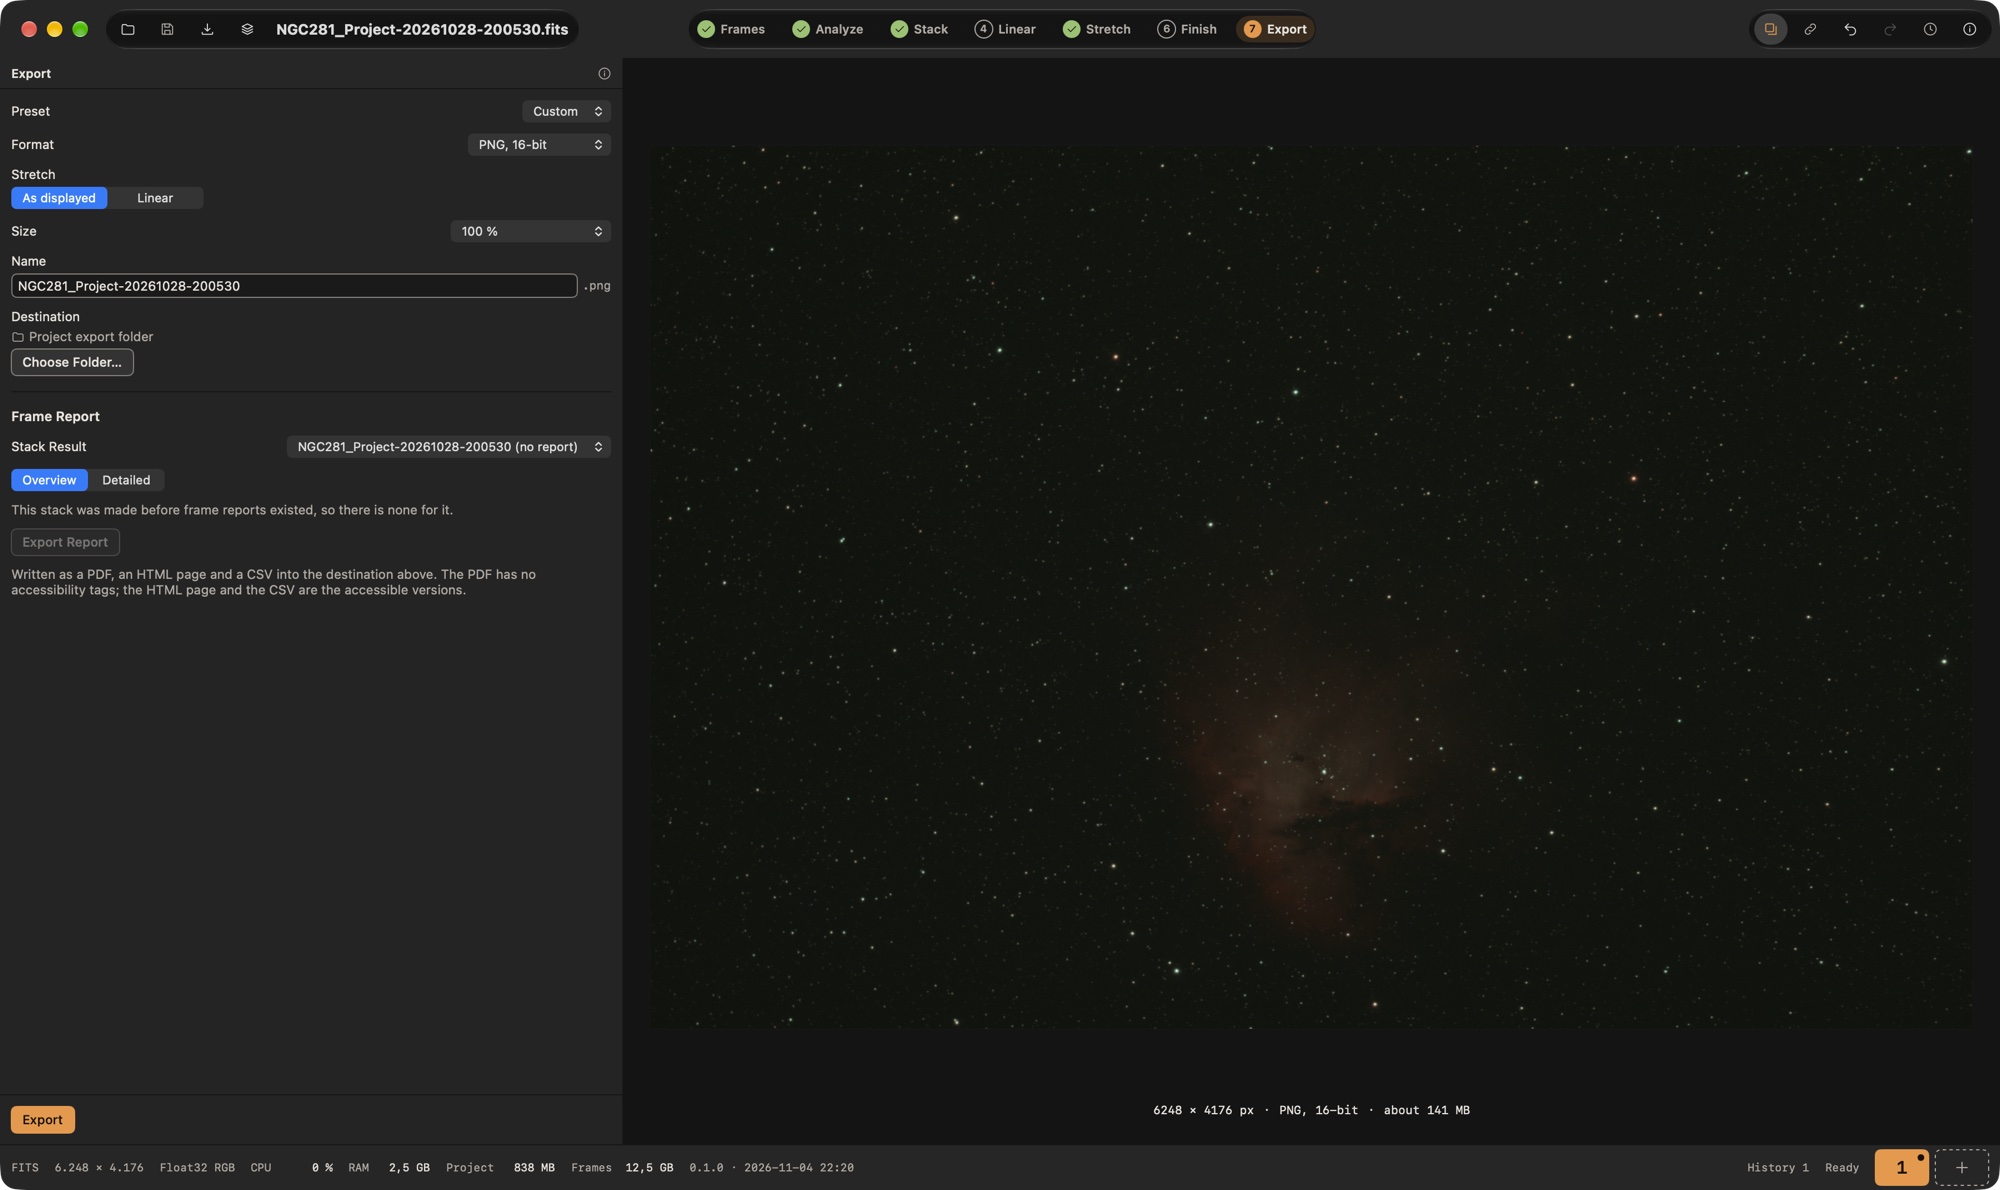
| Setting | What it does |
|---|---|
| Preset | One click for the usual cases. Share: JPEG, quality 90, long edge 2048 px, as displayed. Archive: FITS 32-bit float, linear, 100 %. Print: TIFF 16-bit, as displayed, 100 %. As soon as you change a setting, the menu shows Custom. |
| Format | FITS, XISF or TIFF with 32-bit float, TIFF or PNG with 16 bit, JPEG with 8 bit, see Exporting. |
| Quality | Only for JPEG: 50 to 100 %. A higher value gives a larger file. |
| Stretch | As displayed writes the picture as the canvas shows it: the stretch of Auto-Stretch (and Linked Channels, whichever is set for the window) is baked into the pixels, and values are limited to 0–1. Linear writes the data as it is; most programs show it very dark. FITS, XISF and TIFF 32-bit start with Linear, the other formats with As displayed. When you change the format, the stretch follows the new format's start value, unless you chose a different one yourself. |
| Size | 100 %, a long edge of 4096, 2048 or 1024 px, or Custom with a number of pixels. The short edge follows the aspect ratio. Siderea never enlarges an image, and a raw single-color mosaic that is not yet debayered is never resized. |
| Name | The title of the image, with characters a file name cannot hold (/ : \ * ? " < > | and control characters) replaced by "-", the same rule as for the names of masters. A name that is too long for a file name is shortened (a file name holds 255 bytes; umlauts and emoji take more than one). Siderea keeps the name you type for that image until you close it. The extension is added from the format. With Export all open images the field is off and every image is named after its title. |
| Destination | The export folder of the project, or any folder you choose with Choose Folder…. Project Folder goes back. A chosen folder is forgotten when you open another project. |
The picture is a reduced copy of the image (at most 2048 px on the long edge), so it stays quick while you change settings; it can look a little softer than the file. The line below it gives the size and the file size of the real export.
Next to the picture Siderea shows the size of the file. For FITS and XISF it is exact; for TIFF it is the pixel data plus a few kilobytes, and for PNG and JPEG a rough guess marked about, because it depends on how much noise the image has.
If a file of that name exists, Siderea asks whether to Replace it, Keep Both (the new file gets a number) or Cancel. With more than one image open, Export all open images writes each of them with the same settings; the files are named after the images' titles, a name that is taken gets a number ("M31 2.jpg"), and nothing is replaced. Afterwards Show in Finder shows the files. If a file cannot be written, Siderea names it in the message and writes the others anyway; every image whose file was written counts as exported. Siderea remembers the settings you used last for the next time.
JPEG, 16-bit TIFF and PNG are written in the sRGB color space (single-channel images in a gray profile with the sRGB curve), so every program shows them like the canvas does. TIFF 32-bit is tagged linear, as before. The step counts as done when the image was exported and has not changed since.
The frame report
Below the image settings the panel has a Frame Report section. It writes a report on the frames that went into one stack: a PDF for reading and printing, an HTML page with the same content and a CSV with the list of files for a spreadsheet. Every stack that finishes saves a record of what went into it next to its result file in the results folder (<result>.frames.json), so the report can be made at any time, also after you changed or removed frames, masters or sessions. Stacks from before this feature have no record; the section says so and cannot write a report for them. Deleting a result deletes its record, too.
| Setting | What it does |
|---|---|
| Stack Result | The stack the report is about. It starts with the result of the active image if that has a report, else with the newest stack that has one. With several filters every filter's stack has its own report with only its own lights and the calibration used for them. |
| Overview / Detailed | Overview is one A4 page for a typical project: the project and the result, the nights it spans and the total exposure, tiles for the numbers of lights, flats, darks, bias and nights, a table with what was captured each night, and the calibration of each session as the window Sessions and Calibration showed it when the stack was made (own frames, shared, All Sessions, a finished master from the library or the project, without flat, missing; a round warning mark where that window warned, with the warnings listed below). A project with very many nights or sessions continues on further pages; a table that goes over a page break starts again with its heading and header, and no row is cut. Detailed adds, from a new page, which calibration each group of lights got (for a flat or dark built from frames also the bias it was corrected with) and every file by night and type, one row each: capture time of day in UTC and in the project's time zone (the night's heading names the date; +1d or −1d marks a time on a later or earlier calendar day than the evening that names the night), exposure, filter, gain, sensor temperature, status (Used, Reference, Skipped, Excluded, Session excluded, File not found) and, where the Analyze step has stored them, FWHM, stars and score. The reason a frame was skipped stands in full under its row. Frames of another session than the night's own (the flats of All Sessions, say) are listed in a block of their own. The header of the table repeats on every page. |
| Export Report | Writes <result> – Frames.pdf, <result> – Frames.html and <result> – Frames.csv into the destination chosen above. If a file of that name exists, all three get the same number ("… – Frames 2.pdf"); nothing is replaced. The file names always end in "Frames", also in the German app, so reports of one project sort together whatever the language. Show in Finder shows the files. |
Nights are the nights Siderea uses everywhere: a night runs from local noon to the next local noon, and the capture time of a camera RAW frame counts as UTC, because its file carries the camera's clock reading without a time zone (the report marks these times with a dagger). The CSV always lists every file, whichever level the PDF has. It is UTF-8 with a byte order mark and quoted as RFC 4180 asks; the columns are separated by a semicolon where your language writes the decimal point as a comma, otherwise by a comma. Text that a spreadsheet would read as a formula (a file name that starts with =, +, - or @) gets an apostrophe in front; numbers are not changed.
The PDF is a print-style document without accessibility tags: it has no structure, language or reading order that a screen reader could use. The HTML page and the CSV are the accessible formats. The HTML page holds the same report as the PDF (same level) as a web page with a language and title, headings, and tables with named columns and row headers; open it in any browser. The CSV lists every file. See Accessibility.
When the stack's reference frame was solved, the top of the report has a Field line with the centre of the picture (right ascension and declination), its size in degrees and the pixel scale, a line Main objects with up to five of the most prominent objects in the field in the language of the report (M 42 · Orion Nebula, M 42 · Orionnebel), and the name of the reference frame the solution comes from. A stack without a solved reference frame has no such lines; the CSV is not changed.
The report is written in the language of the app, with the date and number formats of your region (the dates, the decimal separator and with it the CSV separator all follow that region), and the writing runs in the background: Export Report shows a progress indicator until the files are there.
The status bar
Besides the format and size of the active image, the status bar shows what Siderea costs your Mac, updated about once a second:
| Value | Meaning |
|---|---|
| CPU | The load of Siderea in percent of one processor core. 100 % is one fully used core; while a stack runs on several cores, the value goes above 100 %. It turns to the accent color when Siderea keeps nearly every core busy. |
| RAM | The memory Siderea currently holds. |
| Project | The disk space the open project folder takes: cache, masters, results, export, logs and the project file. The original frames are not counted, because the project only refers to them. Shown only while a project is open. Hold the pointer over it to see how the size divides into cache, masters, results, exports and logs. |
| Frames | The disk space the frames you added take, counted from the files where they are. They are not part of the project folder; this is the number to look at if you wonder where your disk space went. Frames that are missing are not counted. Shown only while a project is open. |
The project size is measured again when the project opens and whenever the cache, the masters or the results change, and every ten seconds otherwise. The frames size is measured again when frames are added or removed. Hold the pointer over a value for an explanation. Show system usage in the settings hides all the values.
When the window is too narrow for everything, Siderea first leaves out the frames size, then the project size, then the memory, then the CPU value; the other texts of the status bar stay and never wrap.
Right next to them the status bar shows the version of Siderea and the time this build was made, for example 0.1.0 · 2026-10-28 14:32. It is always shown, so you can tell which build you are running.
At the right end sit the desktop tiles, see Desktops.
Image windows
Every image you open — a file, an edit project or a finished stack — appears in a window of its own on the canvas. Open the same file twice and you get two windows, which is the easy way to compare an image before and after an edit.
The buttons in the title bar, from left to right:
| Button | What it does |
|---|---|
| Close | Closes the window. If the image has edits that you neither exported nor saved as an edit project or session, Siderea asks first. |
| Minimize | Shrinks the window to a small tile with a thumbnail in the bar at the bottom of the canvas. Click the tile to bring the window back to where it was. |
| Roll Up | Shrinks the window to its title bar; click again to unroll it. A double-click on the title bar does the same. |
| Maximize | Lets the window fill the canvas; click again to restore its size. |
| Auto (right end of the title bar) | Switches the auto-stretch of this window on or off, whichever window is active. While it is on, the pill is filled in the accent color (dimmed in a window that is not active); while it is off, it is only outlined. Its tooltip tells whether it is on or off. It changes only how the image is shown, not the pixel data, the history or the export. |
The title bar also shows the file name and the current zoom, for example "Fit · 11 %" while the image follows the window size, or "50 %" after you zoomed.
Drag the title bar to move a window and drag its edges or corners to resize it. Click a window to make it the active one: it gets the colored frame, and the tool panel, the toolbar, Undo, Export… and the status bar work on it. The tool panel keeps the open module when you switch windows, but starts from the module's default values. A window can be moved only so far that part of its title bar stays on the canvas.
Everything also works without the pointer, through the menu Window (the windows are not separate macOS windows, so the system's window commands do not reach them). ⌘W (File → Close Image) closes the active image; with the help or the settings window in front it closes that window instead. In the steps that do not show the image windows (1 Frames, 2 Analyze and 3 Stack) it closes the Siderea window itself, not the image behind it.
In the menu Window:
| Command | What it does |
|---|---|
| Tile Windows | Arranges all visible windows side by side in equal cells. |
| Cascade Windows | Staggers the windows, each a little right of and below the one behind it. |
| Sync Views | While on, all windows show the same zoom and the same part of the image as the active one, so you can compare details. The toggle button in the toolbar does the same. It is off by default and needs at least two windows. |
| Next Image Window, Previous Image Window | ⌥⌘→ / ⌥⌘←: make the next or previous visible window the active one. Repeating it visits every visible window. Below the commands the menu lists all images of the shown desktop by name; choosing one makes it active and brings it back from the minimized bar. |
| Minimize Image | ⇧⌘M: shrinks the active window to the minimized bar, like the Minimize button. |
| Move Image Window | ⌃⌘ and an arrow key move the active window by 20 points. Needs a window in its normal state (not rolled up or maximized). |
| Resize Image Window | ⌃⇧⌘ and an arrow key change the size of the active window by 20 points: → wider, ← narrower, ↓ taller, ↑ shorter. The window stays on the canvas and does not get smaller than its minimum size. |
| Move Image to Desktop | Moves the active window to another desktop: the submenu lists the other desktops and New Desktop, the same as Move to in the title bar's context menu. The image windows commands of this menu work in the steps that show the image windows (Linear, Stretch, Finish and Export). |
File → Save Session… saves all windows with their places, sizes, zoom and the steps of each image; File → Open Session… adds the windows of a saved session to the ones that are open. See Sessions. When you quit Siderea, it asks first if the project has unsaved changes (Save, Don't Save or Cancel), if a stack is running or frames are being added (quitting stops them), or if an image has edits that no export, edit project or session holds. Return never picks the choice that throws something away: it saves the project, or with a stack running or unsaved image edits it cancels the question.
Desktops
When one canvas gets crowded, spread the windows over several desktops, for example the stack and its stages on one, the finished image and its comparisons on another. Each desktop is a canvas of its own with its own windows; the tool panel, the toolbar and the status bar always work on the active window of the desktop you are looking at. Siderea has up to nine desktops and starts with one.
The desktop switcher sits at the right end of the status bar: one tile per desktop, the shown one in the accent color. A green dot on a tile means there are windows on that desktop. A desktop can have a name, such as "Stacking" or "Color": its tile shows it next to the number, cut short with "…" if it is long, and the tooltip, the menu Window, the Move to menu of a window's title bar and the remove question show it in full. The more desktops have a name, the less room each name gets on its tile. In the menus an entry reads number and name, for example "2 · Stacking"; a desktop without a name is called "Desktop 2".
| To … | Do this |
|---|---|
| switch to a desktop | Click its tile, press ⌃⌥1 to ⌃⌥9 (⌃1 to ⌃9 belong to macOS and its Spaces), or choose its entry in the menu Window, which has one entry for each desktop that exists. |
| add a desktop | Click the dashed tile with the plus, or choose Window → New Desktop. The new desktop is shown right away. The plus disappears at nine desktops. |
| name a desktop | Double-click its tile, or right-click it and choose Rename…. Type the name (up to 40 characters) and press Return; Esc leaves it as it was. An empty name removes the name, and the desktop is called "Desktop 2" again. |
| remove a desktop | Right-click its tile and choose Remove Desktop. The desktops behind it move up, so the numbers always follow the order. The last desktop cannot be removed. |
If a desktop still has windows when you remove it, Siderea asks where the images should go: to another desktop (the one to its left is preselected) or Discard Images, which closes them. When some of those images have edits that you neither exported nor saved as an edit project or session, the question says how many, because discarding loses them. An empty desktop is removed without a question.
To move a window to another desktop, right-click its title bar and choose Move to and the desktop, or New Desktop to put it on a new one. With only one desktop the entry reads Move to New Desktop. At nine desktops New Desktop is greyed out. The desktop you are looking at stays, and the window appears on the other one.
Opening a file or finishing a stack puts the new window on the desktop you are looking at. Sync Views only affects the windows of the shown desktop. File → Save Session… keeps every window together with its desktop, plus the number of desktops, their names and the one that was shown. Open Session… brings them back on their desktops when no image is open; with images already open, all windows of the session are added to the shown desktop.
Zoom and pan
Pinch on the trackpad to zoom, or use the menu View. The commands and the badge work on the active window:
| Command | Shortcut |
|---|---|
| Zoom In | ⌘+, also ⌘= (the menu has a second entry for it) |
| Zoom Out | ⌘− |
| Fit in Window | ⌘0 |
| Actual Size (100 %, one image pixel per screen point) | ⌘1 |
The badge bottom right offers the same: zoom out, the current zoom (click it for 100 %), zoom in and fit. It reads Fit · n % while the image is fitted. To move a zoomed image, drag it or scroll with two fingers. From 100 % up the pixels are shown as hard squares, so you see the real data instead of a smoothed copy.
With the keyboard: click the image (or move the focus to it) and the arrow keys, Page Up, Page Down, Home and End scroll a zoomed image. View → Pixel Crosshair (⌥⌘P) puts a crosshair in the middle of the image and shows the pixel readout for it, the way the pointer does. With the image focused, ⌥ and an arrow key move the crosshair by one pixel (⇧⌥ by ten), scrolling the image along when it would leave the screen; Esc removes it. VoiceOver reads the pixel's position and values.
Stacking
The stack button in the toolbar (or File → New Stack…, ⇧⌘N) opens step 3, Stack, where you combine the frames of the open project into one image. The step works on the project and on the master library, not on a list of its own. A project without lights builds only master frames there. See Stacking.
Projects
A project is the list of frames you collected for a stack, sorted into Lights, Darks, Flats and Bias (and Unsorted, for frames Siderea could not classify). These commands are in the File menu:
| Command | Shortcut |
|---|---|
| New Project… | ⌥⌘N |
| Open Project… | ⌥⌘O |
| Add Frames to Project… | ⇧⌘I |
| Save Project | ⌘S |
| Save Project As… | ⇧⌘S |
A project is a folder and takes its name from it. The disk button in the toolbar saves the project from every step like Save Project; it turns accent and shows a small dot while there are unsaved changes. Save Project and the button are only available while there are unsaved changes; Save Project As… is always available. Save Project creates the folder with its subfolders; Open Project… takes a project folder. The project remembers where the frames are, it does not copy them; see Project folders. You see and edit the frames in the Frames step.
The start dialog
Siderea always works in a project, so it asks for one every time it starts. The main window opens only once you have chosen a project folder.
- Continue Last Project opens the project you used last, with one click. If its folder is gone, the button offers the next project on the list instead.
- New Project… asks for a name and a place and creates the project folder there.
- Open Project… opens a project folder you choose.
- Recent Projects lists the last ten projects with their names and folders. A click opens one without asking for the folder again. A project is dimmed when its folder can no longer be found (deleted, or on a volume that is not connected) or no longer has a project manifest; remove it from the list with the × button. A folder you only moved still opens, because Siderea finds it again through its bookmark, and the entry then shows the new location.
In the menu, File → Open Recent Project offers the same list and File → Switch Project… saves the open project and brings the start dialog back. Opening or creating another project saves the open one first, too. An image you open with File → Open Image… belongs to the open project, so its history and exports go there; switching the project closes all images, and if one has unsaved edits, Siderea asks first. While a stack runs you cannot switch projects: New Project…, Open Project…, Open Recent Project and Switch Project… then show a message instead of acting; cancel the run or let it finish first.
Adding frames
Add Frames to Project… (or Add Frames… in the Frames step) opens a panel where you choose FITS or camera RAW files, or whole folders. You can also drop files and folders from Finder onto the Frames step. Folders are searched including their subfolders; other files are ignored. Siderea reads only the file headers and puts every frame into a group:
- by its
IMAGETYPkeyword, if it has one; - otherwise by the name of its folder or the folder above it, such as
DarksorFlats. The names are the same as in the Stack step; - frames that say nothing at all go to Unsorted, so you can see which frames still need a decision. Frames in Unsorted are not stacked, and the checks remind you of them.
The Stack step stacks the frames of the same project, sorted the same way.
A file that is already in the project is not added a second time, even if you choose it twice, for example once directly and once through its folder, or through a symbolic link. Links inside a folder are followed: a link to a file adds that file, a linked folder is searched like any other. Hidden files and folders are skipped. Dark flats are not supported yet and are reported, like files that are not FITS or camera RAW files or cannot be read: after the import, a message lists the first of them with the reason.
Large folders take a while. The status bar shows Adding frames with the number of files read so far and the number found. Cancel next to it stops the import; the frames read until then stay in the project.
The Frames step
Step 1 Frames uses the whole window instead of a tool panel and the canvas. The image windows and the history strip are hidden while it is open and come back when you open another step. It has two parts: the sidebar on the left and the table of frames next to it. The step is for collecting and sorting: add frames, put them into groups and sessions, leave frames out of the stack. Looking at the frames and judging them is the job of the Analyze step.
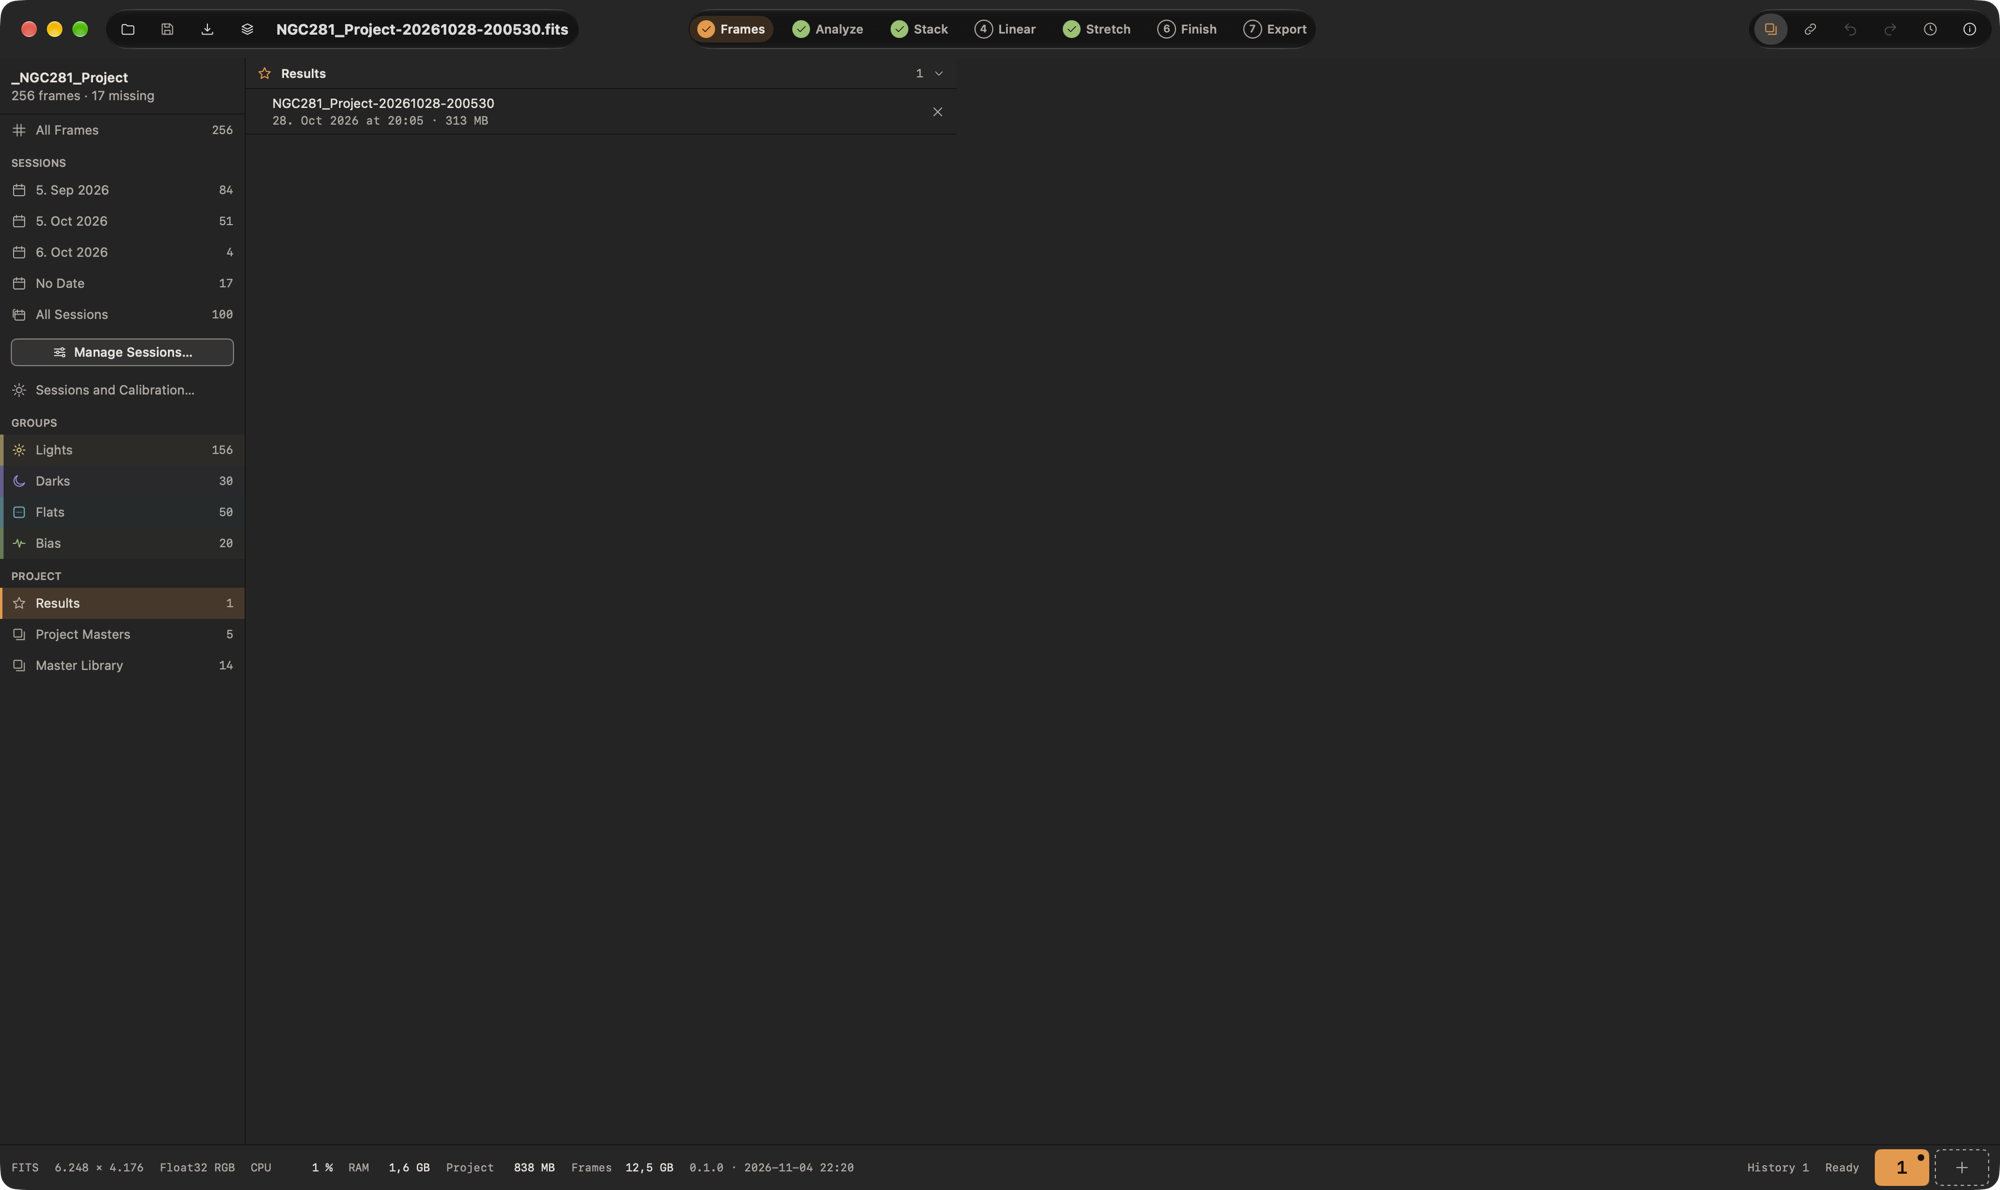
The bar on top has the buttons Add Frames… and Save Project (available while the project has unsaved changes, which the text Unsaved changes next to it tells; the same goes for File → Save Project and the toolbar button), then the counts of what the table shows, such as "126 frames · 2 sessions · 1 marked · 0 excluded" (marked is what the analysis found), and Next: Analyze, which opens step 2. A click on a session, a group or All Frames in the sidebar changes which frames the table shows.
The sidebar starts with the project's name and a summary, such as "112 frames · 4 groups" or "112 frames · 1 missing". Below it you choose which frames the table shows:
- All Frames shows everything. It is selected when you start Siderea.
- Sessions lists the automatic sessions (one for each capture night), the sessions you made yourself and No Date, and last All Sessions, each with its number of frames, see Sessions.
- Groups lists Lights, Darks, Flats and Bias, and Unsorted as soon as a frame is in it. Each kind of frame has its own color and icon: Lights are yellow with a sun, Darks violet with a moon, Flats cyan with a square and Bias green with a pulse line. Unsorted stays neutral.
A click on a session or a group shows just that one; ⌘-click adds it to the ones shown or takes it out, and a click on the only one shown goes back to all. Without a pointer, use Add to Filter (or Remove from Filter) in the context menu of the entry, or as a VoiceOver action. A session and a group combine: the entry 20 Apr 2026 and the entry Flats show the flats of that night. Which entries are selected is not saved in the project.
Under Project are the project's file lists. Choose one and it fills the middle of the step instead of the table: Results (the stacks saved in the project's results folder, newest first, each with its name, date and size; a finished stack is saved there automatically, and a click opens it; the × button deletes the file from the disk after asking), Project Masters (the master frames in the project's masters folder, by type; a stack saves the masters it builds there, named after the Master Names; the tag In use marks the one the project uses; the × button deletes the file after asking, and if the project uses it, the question says so and the project builds that master from its frames again) and Master Library (the masters of all projects, see Master library). Accepting or declining a master for the project, per dark exposure time and per flat filter, is done in the Stack step.
The table has one row per frame. Click a column heading to sort by it, click again to reverse; frames without a value (no exposure time, say) always come last. Without a sort the frames are ordered by group, then session, then time of capture.
| Column | Shows |
|---|---|
| File | The file name; a missing file is struck through. |
| Status | A check mark for a frame that was measured and is fine, a red warning for a frame the analysis marked, with the worst reason (FWHM 40 % above the median), Kept anyway for a marked frame you keep, a warning for a frame that a warning of the Checks names, such as a different gain or size (the message is the text, and a tooltip), Skipped: and the reason for a frame the last stack skipped, Excluded or Session excluded, File not found, or the reason a file could not be read. The status only reads the stored measurements and never starts a measurement; a frame that has none shows nothing yet. When several apply, the first in this order wins: not found, skipped, session excluded, excluded, could not be read, marked, kept anyway, check warning. |
| Session, Time | The session and the local time of capture from DATE-OBS (a dash without one). The hour that repeats when the clocks go back shows its zone, so the two 02:40 of that night differ (02:40 CEST, 02:40 CET). Flats, darks and bias that belong to all sessions or to several have the date in front (19 Apr 2026 18:00), because no night tells the day. A camera RAW frame carries a dagger (22:00 †): its time is the camera's clock, not UTC, and VoiceOver and the tooltip say so. Frames are ordered by the real moment of capture, a RAW frame taken at 22:00 camera time before a FITS frame taken at 21:30 UTC when the project's zone is Berlin in summer; the clock of a RAW frame is read in the project's time zone for that. |
| Group, Filter, Exposure, Gain, Temp. | From the header, with the group's color and icon. A value the header does not give is a dash. |
Excluded frames and missing frames are dimmed. The skipped mark disappears when the next stack starts, when you remove the frame or open another project. Marks of the checks follow the current checks, change with the project and are not saved.
The context menu of a frame acts on the selected frames, or on the one you click if it is not selected. The menu Frame in the menu bar offers the same commands for the selected frames, with shortcuts: Move to (⌃⌘1 to ⌃⌘4 for Lights, Darks, Flats and Bias), Exclude from Stack / Include in Stack (⌘E), Open as Image (⌘↓), Show in Finder (⌘R) and Remove from Project (⌘⌫):
- Move to … puts them into another group. You can also drag the selected frames onto a group in the sidebar; the group lights up while they are over it. Moving is useful when
IMAGETYPwas wrong or missing, in particular for the frames in Unsorted. - Session (lights) puts them into another session, Sessions (flats, darks, bias) assigns them to one or more sessions, see Sessions.
- Exclude from Stack / Include in Stack leaves them out of the stack or takes them back. An excluded frame stays in its group and in the project; its context menu offers Include in Stack. Stacking, the checks and the master suggestions leave excluded frames out, and the Stack step counts only the frames that are stacked, with the excluded ones in brackets. The file itself is never changed or deleted, and Save Project keeps the choice.
- Keep Anyway / Remove Keep keeps a frame in the stack that the analysis marked, or takes that back.
- Review Selected Frames (several lights) opens the Analyze step with only the selected lights in its table.
- Open as Image (one frame) opens the frame as an image window on the canvas, exactly as if you had dropped the file from Finder onto it, and switches to step 4, so you can look at it closely and process it. RAW files are developed like any opened RAW file; use Open Raw Sensor Data… in the File menu for the undeveloped sensor data. A double click on a frame does the same.
- Show in Finder shows the selected files in Finder; files that are missing cannot be shown there.
- Locate Missing Frames… appears while frames of the project are missing, for example after you moved the folder or the drive (also as a button in the bar on top). Choose the folder they are in now: Siderea looks in it and its subfolders for every missing frame by file name (the folders the file sat in make a match surer) and links the ones it finds again, with their group, session and exclusion kept. A name that fits several files equally well is left alone. The bar says how many were found and how many are still missing; Undo takes it back.
- Remove from Project takes the frames out of the project. The files stay on disk. There is no confirmation, but Undo (⌘Z) brings the frames back, see Undo in the project.
Files and folders dragged from Finder onto the step are added like with Add Frames….
A frame whose file Siderea could not find when it opened the project is shown with its name struck through, the status "File not found" and a warning mark. You can move and remove it like any other frame. If you save the project it is kept; once the file is back, adding it again makes it a normal frame.
Sessions
A session is one night of capture of your lights. Siderea sorts the lights into sessions by their capture date (DATE-OBS), so lights taken on several nights are kept apart in the sidebar. A night runs from noon to noon, in the time zone of the project (a new project gets the time zone of your Mac; change it under Manage Sessions… with the Time Zone menu, for example for a remote observatory): frames taken at 22:00 and at 03:00 the next morning belong to the same night, and 12:00 starts the next one. A session is named after the evening it began, such as 20 Apr 2026. Lights without a readable DATE-OBS go to the session No Date; a DATE-OBS that ends in Z or a zero offset (+00:00) is read as UTC, but one that names another time zone (such as +02:00) counts as not readable, because it is meant to be UTC. A night in which you only took flats, darks or bias is not a session.
A light is in exactly one session. Flats, darks and bias are in no session of their own. Until you assign them, they are in All Sessions, which serves every session you have now and the ones you add later, because a flat or dark library does not depend on the night. You can assign them to one session or to several: they then count for each of these sessions and for no other. The sidebar lists the automatic sessions from the oldest, then sessions you made yourself, No Date, and All Sessions last; a frame assigned to several sessions is listed under each of them. Stacking calibrates every session with the flat, dark and bias assigned to it (or the ones of All Sessions) and stacks all sessions together. Filters are never mixed: lights only get flats of their filter, however the flats are assigned.
To change the session of lights, select them and choose Session in the context menu:
- Each session of the project is listed; a check mark shows the one all selected lights are in. A light is in one session, so a click moves them there.
- New Session… asks for a name, makes an empty session with that name and puts the frames into it.
- Back to Automatic Session takes back your choice, so the lights follow the rule above again.
To assign flats, darks or bias, select them and choose Sessions:
- All Sessions is at the top; a check mark shows that every selected frame is in it. Choosing it takes back any assignment.
- Below it every session of the project is listed with a check mark for each one all selected frames are assigned to, and a dash for one only some of them are assigned to. A click on a session adds it to the frames, or, when all of them have it, takes it out again. Click two sessions to assign the frames to both. Take out the last one and the frames are in All Sessions again.
- If the selection contains a light, the menu is the one for lights: each frame goes into the one session you click.
In the Stack step the flat cell of the session overview has the same menu for the flats of its filter. The window Sessions and Calibration shows all sessions against their flat, dark and bias at once and does the same assignments in a popover per cell. Open it with Sessions and Calibration… under Sessions in the sidebar or with File → Sessions and Calibration…. The window Manage Sessions lists the sessions of your lights with their numbers, calibration and a note, and renames, merges, excludes and deletes them in one place. Open it with the Manage Sessions… button under the sessions in the sidebar, Manage Sessions… in the context menu of a session or File → Manage Sessions….
Changing a session marks the project as changed; the files are not touched. A night without lights disappears from the list. A session you made yourself stays, empty, until you delete it.
The session menu. Right-click a session in the sidebar to manage the whole session, with its frames in all groups:
- Rename… asks for a name that replaces the date in titles and in the names of masters. The field starts with the name you gave before; a night without one shows its date in grey instead, so the date is not mistaken for a name. An empty name goes back to the date. The session keeps its identity, so nothing in the stacking cache is calculated again. No Date and All Sessions cannot be renamed.
- Merge Into lists the other sessions and moves all frames of this session into the one you choose. The session then disappears, and a session you made yourself is deleted. Back to Automatic Session on those frames undoes it for each frame. Flats, darks and bias assigned to several sessions get the session you merge into in its place (once, if they had it already). What you decided for the session follows its frames where the session you merge into has not decided itself: a master you accepted or declined for it, and running its lights without a flat. Where it has, its own decision stays, and the rest is dropped. Running without a flat follows only where the session you merge into has no flat for that filter; if it has one, its lights keep it and the choice is dropped. Deleting a session you made yourself drops its decisions as well.
- Exclude from Stack leaves the whole session out of the stack: its lights, and the flats, darks and bias you assigned only to it. Calibration frames that are also assigned to a session you still stack stay and serve that one. The frames themselves are not marked as excluded, so Include in Stack brings back exactly what was there. The session is shown dimmed and struck through, its frames say Session excluded. Darks and bias in All Sessions still serve the other sessions. The Checks, the session overview and the frame counts of the Stack step follow what is stacked.
- Delete Session removes a session you made yourself while no light is in it. Flats, darks and bias assigned to it leave it: a set of sessions loses this one, and frames that were assigned only to it are in All Sessions again.
All Sessions has no menu. No Date can be excluded and merged, but not renamed. The same actions, plus a note for each session, are in the window Manage Sessions; Manage Sessions… at the end of the session menu opens it on this session.
The Image section
The panels of steps 4 to 6 start with the Image section, which used to be at the top of the Files panel. Click its header to close or open it; it is open when you start Siderea. It has the buttons Open Image…, Export… (opens the Export step) and Open Raw Sensor Data…, which do the same as the commands of the File menu (Export… needs an image), and they are unavailable while Siderea is busy. Below them are the facts about the current image: the file name (or the title of a stack that has no file), its size, whether it is mono or RGB, and what the file header says: the Bayer pattern, exposure time, gain, sensor temperature, filter, observation date (DATE-OBS) and frame type. A value the image does not have is not listed. Without an image the section says "No image open." and offers the buttons to open one.
The Analyze step
Step 2 Analyze fills the whole window like Frames. It measures every light at full resolution (stars, FWHM, roundness, signal, sky background), draws the values of a night in a chart, lists them in a table next to a preview of the shown frame, and marks the frames that stand out against the others of their filter and exposure time, with the reason. Exclude All Marked leaves them out of the stack, Keep Anyway keeps one you want; nothing happens by itself. The measuring starts when you open the step and goes on in the background; Next: Stack opens step 3. File → Review Frames… (⇧⌘R) opens the step. All of it is described in Analyze frames.
The Stack step
Step 3 Stack fills the whole window and stacks the open project. It shows what the run would take (the frames per group and filter, with Edit in Frames back to step 1), the checks, the sessions and the masters with Use, Decline and Reset, and has the settings, the cache (sizes and Clear Cache) and the Start Stacking button. Once a run was started, the progress, the log, Show Log and the outcome of the run are shown below. After a stack, Next: Linear opens step 4 with the result. The run goes on when you open another step; the step bar shows its progress on the number of step 3. All of it is described in Stacking. File → Show Logs in Finder opens the project's logs folder with the logs of all runs.
Master library
Siderea can keep finished master bias, dark and flat frames for good, so you build them once and use them in later sessions. File → Import Master Frames… opens a panel where you choose one or more FITS files. A file is accepted if its header says MASTER = T, which Siderea writes into the masters it builds, and IMAGETYP is Bias, Dark or Flat. Siderea copies the file into its library; your original stays where it is. Files that are no masters are not imported, and after the import a message lists the first of them with the reason.
For each master the library remembers its type, the camera (INSTRUME), gain, sensor temperature, exposure time, image size, the filter (flats), the date it was built and the number of frames it was built from. The lists in Project Masters and Master Library show the night the frames were captured in (Night of 20 Apr 2026, from DATE-OBS, read like the proposed master name and the sessions), and the day the master was built (Created 9 Sep 2001) only when the header has no capture date. Older masters do not name the camera or the number of frames; these stay empty. The library lives in Siderea's own Application Support folder (Siderea/Masters, inside the app's container), so no access dialogs are needed. Besides importing, a stack can add the masters it builds to the library: turn on Add new masters to the library in the stacking settings. A project with only darks, flats or bias builds just the masters, see Building masters without lights.
Viewing the library
The entry Master Library under Project in the sidebar of the Frames step (the number is how many masters the library holds) lists the library by type: Bias, Darks and Flats, each with its count. A type without masters is not shown. For each master you see:
- its name (the file name it came with, unless you renamed it) and, if the open project uses it, the tag In use;
- exposure time, gain and sensor temperature, for example "180 s · g120 · −10.1 °C";
- the filter (flats), the camera, the number of frames it was built from and the night its frames were captured in (Night of 20 Apr 2026: the night of the earliest
DATE-OBSamong them in the project's time zone, or in UTC for a master made from camera RAW frames; Created … with the day it was built if the header has no capture date). Whatever the header does not say is left out.
Click a master to select it. Rename (context menu, or double-click) edits the name in place: Return saves, Escape cancels, and an empty name is ignored. It only changes the name Siderea shows; the FITS file is not touched. Delete… asks first, because it removes the master from the library for good and cannot be undone. If the open project uses the master, the question says so, and the project then builds that master from its frames again. Show in Finder shows the library's copy. Your original file, if you imported one, is never touched.
Without masters the section says "No masters" and tells you how to get some: File → Import Master Frames…, or Add new masters to the library in the Stack step. Below the list, Import… opens the same import panel, and Go to Stack switches to the Stack step, where suggestions are accepted or declined.
Matching masters
For the lights of a project Siderea can look for fitting masters in the project and the library, so darks and flats need not be stacked again. It compares what the headers say with the lights of the project: their most common gain (or ISO, if they name no gain), their mean sensor temperature, the size of the first light, and the camera they name. It does that for each master the lights need: a dark is compared with the exposure time of the lights it is for (each exposure time has its own row), a flat with the filter of its lights (each filter has its own row).
| Master | Has to match |
|---|---|
| Dark | gain, sensor temperature (within 2 °C), exposure time (within 1 %) |
| Flat | filter, gain, image size |
| Bias | gain, image size |
Where neither the master nor the lights name a gain, the ISO takes its place in this table; a gain is never compared with an ISO. A master built from DSLR frames remembers its ISO in the library; masters added before that version do not, and their ISO counts as not named.
- The candidates are the masters of the project's own
mastersfolder and those of the library. The result names where each one comes from, Project or Library. - A master dark that has its bias removed may have another exposure time, because Siderea scales it. It needs a bias for that: bias frames in the project or a master bias that you accepted for it.
- The filter of a flat is compared with the filter of the lights it is for; if they name none, with the filter of the project's own flats.
- The camera (
INSTRUME) is compared for all three types, ignoring upper and lower case. A master from another camera does not fit if the master and the lights both name a camera. If the lights name none, the camera is not compared at all; if only the master names none, it counts as not compared (next point). - A value that the master or the lights do not name is not compared, and such a master ranks behind the ones that do.
- Several fitting masters are ranked: the closest to the lights first, then the newest. For a master that does not fit, Siderea knows which values differ.
A project remembers, for bias, dark and flat separately, whether you accepted a master from the project or the library or declined to use one. The choice is saved in the project; older projects simply have none. A master that is assigned to a project replaces the Master Bias, Master Dark or Master Flat step of a stack for that type: those frames are not combined again, and the master from the project or the library is used as if it had just been built. You accept or decline a master in the Masters block of the Stack step.
Parameters
Every slider has a number field next to it. It shows four decimals, one decimal for parameters that reach 100 or more, and whole numbers for lengths in pixels. Type a value for precise work; use the slider for a quick feel. For parameters with a very large range of values (for example Stretch) the slider works logarithmically, so small values get as much room as large ones; the number field always shows and accepts the real value. Reset puts all parameters of the open module back to their defaults.
The preview updates while you drag a slider. It is calculated on a reduced copy of the image, so it stays responsive; Apply always calculates at full resolution. The eye button (Live Preview) in the open module switches the live preview on and off. If the preview cannot be calculated, the reason appears as a line of text in the module. The size of the reduced copy is set under Live preview in the settings. A size given in pixels (for example an erosion size of 1 px) can be smaller on the reduced copy than the module allows; the module then rounds it up, so the preview shows more of the effect than Apply will. A note below the controls says so when that happens.
Before and after
While the live preview is on and a module is open, the active image window shows a vertical divider. Left of it is the image as it is now (badge Current), right of it the live preview (badge Preview). Both halves are drawn at the same size and place, so you can compare every pixel, also when you zoom in or scroll.
Drag the handle on the divider to move it across the whole image width; dragging does not move the image and does not start a new preview. The divider starts in the middle and keeps its relative position while you change parameters, zoom or scroll. A badge disappears when its side gets too narrow. If a preview fails, the last good one stays on the right. The divider is gone as soon as the live preview is off, the module is closed, or you apply or undo a step.
With VoiceOver the divider is the element Comparison Divider with its position in percent; adjust it with the VoiceOver adjust gesture. Click the divider and use the left and right arrow keys to move it in 1 % steps.
History and undo
Each applied module adds a step to the history. Undo (⌘Z) removes the last step, Redo (⇧⌘Z) puts back the step you removed last; applying a new module ends what could be redone. In a text field the same keys undo and redo the typing instead. The original file on disk is never changed. To keep memory free, older steps are parked in the cache/history folder of the project and read back when you undo or redo; closing or switching the project removes them.
Undo in the project
In the Frames, Analyze and Stack steps (and in the windows Sessions and Calibration and Manage Sessions) Undo and Redo act on the project instead of the image: the menu item names the edit, for example Undo Exclude Frames. These edits can be undone: moving frames to another group, excluding and including frames or sessions, Keep Anyway, assigning to a session and going back to the night of capture, creating, renaming, merging and deleting sessions, session notes, Run Without Flat, the choice of a master, Remove from Project and adding frames. Siderea remembers the last 100 edits until you close the project. If you undo every edit since the last save, the project counts as unchanged again. Deleting a master file cannot be undone and ends what could be undone before it. Files on disk are never touched by Undo. In a text field the keys still undo the typing first.
The history strip lists the original file and the applied steps, oldest first, each with the workflow step its module belongs to. Open and close it with the History button in the toolbar, View → History or ⇧⌘H. It stays where you put it in every step and when you quit and start Siderea again. The status bar shows the number of steps.
Settings
Language, the auto-stretch defaults, the live preview size and the histogram scale are in the settings (⌘,).
Display and accessibility
All shortcuts, what VoiceOver reads and what does not work yet are on the page Accessibility.
Siderea follows these system settings (System Settings → Accessibility → Display):
- Increase Contrast makes secondary text, icons, outlines and dividers stronger (lighter in the Dark color scheme, darker in Light) and the accent more vivid, and dims excluded or locked entries less.
- Reduce Transparency draws the plates behind the readouts on the image (pixel values, zoom buttons, the Current / Preview badges, the histogram button, the preview's readouts) opaque.
- Differentiate Without Color enlarges and outlines the markers of the night chart; its groups already differ by shape as well as by color.
Text fields have a thin outline; the field you are typing in gets a thick accent frame. While you drag files over the window or a group, the area under the pointer gets a thick accent frame.