
Stacking
Stacking combines many exposures of the same sky into one image with far less noise. Siderea does it in step 3 Stack of the main window. The step works on your project and on the master library: you collect the frames in step 1 Frames, let step 2 Analyze find the bad ones, check the warnings in step 3, press Start Stacking, and the result opens as a new image window (one per filter, see Filters and exposure times). Without lights the same step builds only master frames, see Building masters without lights.
Open the step with the Stack button in the step bar, with ⌥⌘3, with the stack button in the toolbar, or with File → New Stack… (⇧⌘N). There is no separate stacking window.
The Stack step
The step fills the whole window, like the Frames step. It does not edit frames: add, sort, move, exclude and remove them in the Frames step, and the Stack step shows what that makes of the next run.
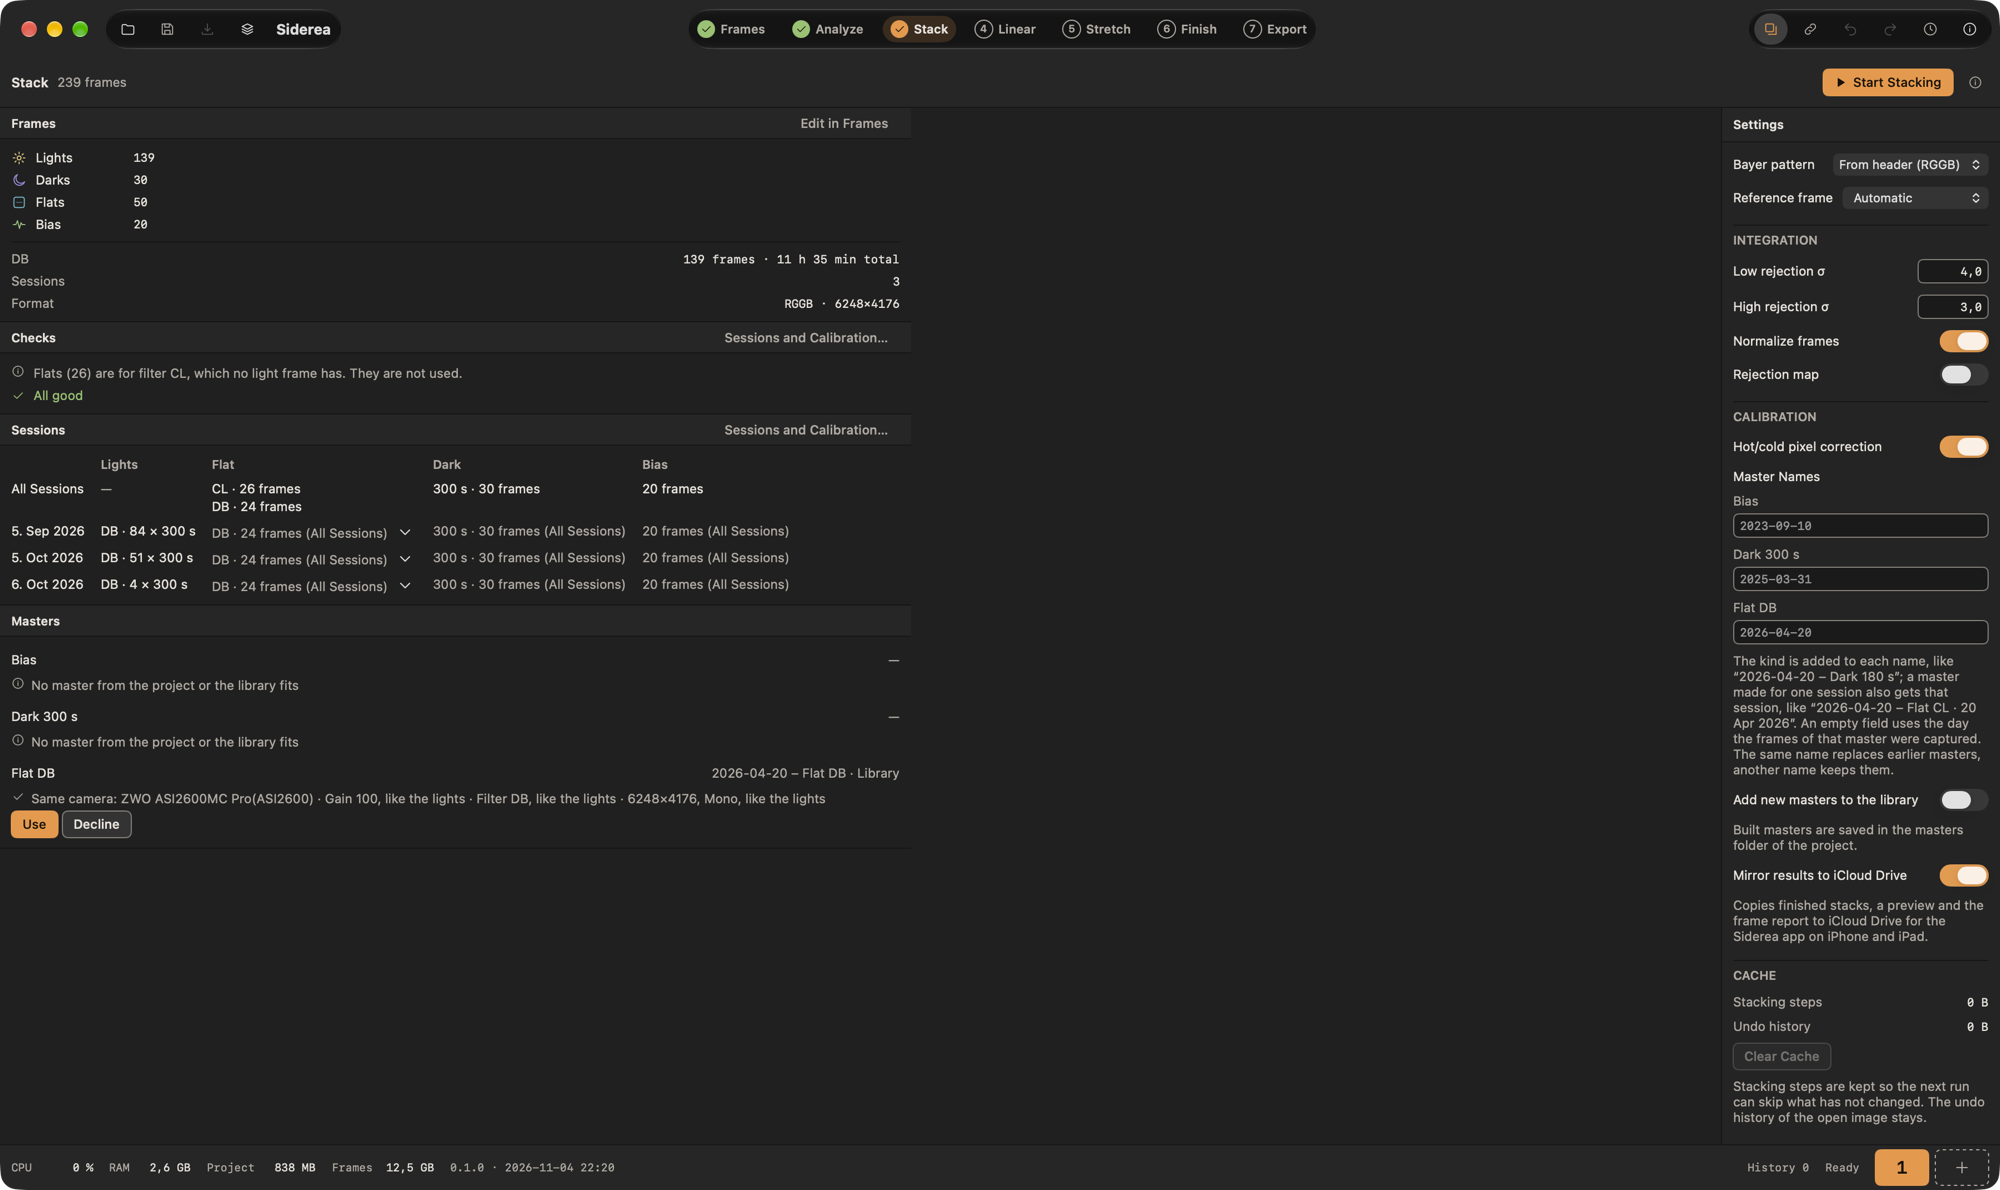
| Part | What it shows |
|---|---|
| Top bar | Start Stacking (Build Masters without lights) or, while a run goes, Cancel. ⌘Return starts the run (Return alone does not, so a field of the step cannot start it by accident), and Stack → Cancel Stack (⌘.) stops it from any step. After a successful stack it also offers Next: Linear, which opens step 4 with the first result as the active image. |
| Frames | What the run takes: the frames per group (excluded ones in brackets), the lights per filter with their number and total exposure (written like in Manage Sessions, for example 9 h 18 min), the number of sessions of lights when there is more than one, and the format of the lights (Bayer pattern and size). Edit in Frames goes back to step 1. |
| Checks | The checks of the project's frames. |
| Sessions | The session overview, with more than one session, and for a single session while its flat has something to decide. |
| Masters | One row per master the lights need, with Use, Decline and Reset, see Masters from the project and the library. |
| Settings (right) | The settings of the run and, below them, the Cache: how much disk space the saved stacking steps and the undo history of the open image take, and Clear Cache, see Saved steps. The measurements of the Analyze step are not part of it. |
| Progress (below, once a run was started) | One row per step of the run with its progress bar, the log, the outcome (when it finished and how long it took, or why it failed), once the lights are being aligned the alignment results per frame, Show Log and, if you asked for it, Save Rejection Map…. |
A run belongs to Siderea, not to the step: it goes on when you open another step, and the number of step 3 in the step bar shows a ring that fills as the run advances. When the run is finished the result opens as an image window even if another step is open. Before the first run the Progress panel is hidden. Start Stacking is unavailable while frames are still being added to the project and while there is nothing to do; the tooltip of the button and, under the top bar, a line of text say which of the two it is and what to do about it.
FITS and camera RAW
Stacking reads FITS files and camera RAW files (Canon, Nikon, Sony and others with a Bayer sensor). RAW frames are read as undeveloped sensor data, see File formats. TIFF, PNG and JPEG frames cannot be stacked.
Adding frames
The frames a stack takes are the frames of the open project. You add them in the Frames step: click Add Frames… or drop files or whole folders on it. Folders are searched including their subfolders. Siderea reads only the file headers and sorts every frame into one of four groups by its IMAGETYP keyword, or by the name of its folder if it has none:
| Group | Frames | What they are for |
|---|---|---|
| Lights | LIGHT | The pictures of your target. |
| Darks | DARK | Same exposure and temperature as the lights, lens covered. They record hot pixels and thermal signal. |
| Flats | FLAT | An evenly lit field. They record vignetting and dust shadows. |
| Bias | BIAS, OFFSET | The shortest possible exposure. They record the sensor's electronic offset. |
Camera RAW files carry no IMAGETYP, so they are sorted by the folder they are in. Siderea looks at the name of the folder and of the folder above it, ignoring case: a name containing dark (or Dunkel) means darks, flat flats, bias or offset bias frames and light lights. A name with both dark and flat marks dark flats. A layout like M31/Lights, M31/Darks, M31/Flats, M31/Bias therefore just works. FITS files without IMAGETYP are sorted the same way, and a file that has an IMAGETYP always goes by it.
A frame that says nothing at all, with no IMAGETYP and no hint in its folders, is not a light: it goes to Unsorted in the project. The Stack step does not stack its frames, but the Checks tell you how many there are ("Unsorted (n) are not stacked. Move them to a group first."). Move them in the Frames step (context menu Move to …, or drag them onto a group) and they take part in the next run.
Darks, flats and bias are optional; you can stack lights alone. Lights are optional too: a project with only darks, flats or bias builds just the masters. Dark flats are not supported yet and are reported when you add them.
The Frames step shows every file with exposure, gain, sensor temperature and size. If a file landed in the wrong group, move it there (Move to …), or Remove it from the project (the files stay on disk). Everything you change changes the project, so the Stack step follows at once, and Save Project keeps it.
Filters and exposure times
Siderea does not mix frames that do not belong together. Within each group the frames fall into sets, and every set gets the masters that fit it:
| Group | Sets | Master |
|---|---|---|
| Lights | one per filter, split by exposure time inside | one result per filter |
| Flats | one per filter, whatever the exposure times of the frames (they only vary with the light source) | one master flat per filter |
| Darks | one per exposure time (three significant digits: 60 s and 60.4 s are two sets, 59.99999 s and 60 s one) | one master dark per exposure time |
| Bias | one | one master bias |
A flat belongs to the lights of the same filter (upper and lower case do not matter). A dark belongs to the lights of the same exposure time, with up to 1 % difference. If there is no such dark, Siderea uses the dark with the nearest exposure time: with bias frames, or a dark that has its bias removed, it is scaled to the light exposure; otherwise it is subtracted as it is, which the Checks warn about. A project with one filter and one set of flats pairs them even if only one of them names a filter, as capture programs often write FILTER into only one kind of frame.
- Lights with a filter that has no flats are calibrated without a flat; the Checks warn about them and name the lights. Flats of a filter that no light has are not used in a stack (the Checks say so); they are built when you build masters without lights.
- A run makes one result per filter. Each filter is calibrated, debayered and integrated on its own, but all filters are aligned onto the same reference frame, so the results lie on top of each other pixel by pixel and can be combined later. With Reference frame → Automatic the reference is the best-scored light of the filter with the most lights (from the analysis); you can also pick one yourself, from any filter. Lights without a filter, or lights of a single filter, give a single result like before.
- The progress list names every step of a set: Master Flat CL, Master Dark 180 s, Calibrate Lights CL, 180 s, Align DB, Remove Trails DB, Integrate DB. With only one set of a kind the name has no addition. With several sessions the masters and the calibration carry the session too.
- Frames of another size or channel count than the first light are skipped, as before; the sets all share one size.
The Frames step shows the same values as columns of its table (Filter, Exposure), and you can sort by them.
Sessions
When you stack several nights of the same target, every night can keep its own calibration. A session is one night of lights; flats, darks and bias are for All Sessions or for the sessions you assign them to, and a run reads that:
- Every light gets the flat assigned to its session and its filter. A flat that is in All Sessions serves every session that has none assigned for that filter. Flats are in All Sessions until you assign them, also the flats of the night a session was shot in, so flats of one filter from several nights make one master (the Checks say so, see below). To give a night its own flat, select the flats in the Frames step and assign them to that session (right-click → Sessions). One flat can serve several sessions: assign it to each; the run builds it once for all of them.
- Filters are never mixed. A light only gets a flat of its own filter, also if you assigned flats of another filter to its session: if night A shot CL and you assigned DB flats to it, the CL lights get no flat, the Checks warn about the lights and tell that the DB flats are not used. The one exception stays: a single set of flats without a filter in the header is paired with a single filter of lights (some cameras write
FILTERinto only one kind of frame), but not when the session has lights of two filters. - The dark and the bias come from the assignment of the light's session if it has one, otherwise from All Sessions. For the dark this is decided per exposure time: a dark assigned to the session with the exposure time of the lights wins over one in All Sessions; where neither has the exposure time, the nearest dark is used as described under Filters and exposure times, the session's own first. Darks and bias land in All Sessions when you add them, so one dark library serves every night. A dark or flat that is built is corrected with the bias of its own session, otherwise with the bias of All Sessions, even when every night has a bias of its own and no light uses the one of All Sessions.
- A frame can be assigned to several sessions. It then counts for each and for no other. Frames that belong to the same sessions make one master per filter or exposure time; a session takes all the frames assigned to it, so a flat assigned to A and B and another assigned to A alone give A a master of both and B a master of the first.
- After calibration the nights are stacked together. All lights of a filter, from every session, are debayered, aligned onto one common reference and integrated into one result per filter, as before.
- One night is one night. If the lights are in a single session and no flat, dark or bias is assigned away from it, nothing changes: the steps, the master names and the cache folders are exactly the ones described elsewhere in this guide, wherever and whenever the flats were taken. The one exception is a choice to run without a flat, which counts here too. As soon as the lights are in two sessions, or a calibration frame is assigned to sessions that leave out the lights' session, the rules above apply, and the Checks and the session overview show it.
With several sessions the progress list names the masters and the calibration by session: Master Flat CL · 20 Apr 2026, Master Flat CL · 21 Apr 2026, Calibrate Lights · 20 Apr 2026; a master made for several sessions names them all (Master Flat CL · 20 Apr 2026, 21 Apr 2026) and a dark in All Sessions stays Master Dark. The steps of a session have their own folders in the project's cache, so changing the frames of one night leaves the other night's masters and calibrated lights as they are.
Master names per session
A master made for one session carries the session in its title: Flat CL · 20 Apr 2026, and so in its name under Master Names (one field per session and master) and in the file in the masters folder, for example 2026-04-20 – Flat CL · 2026-04-20.fits. A master made for several sessions carries all of them, sorted and joined with a plus sign in the file and library name: 2026-04-20 – Flat CL · 2026-04-20+2026-04-21.fits; its folder in the cache is named by the ids of the sessions in the same way (master-flat-CL-night-2026-04-20+night-2026-04-21), so renaming a session never makes it stale. The grey placeholder of each field is the day that master's own frames were captured. A master of All Sessions is named as before (2026-04-19 – Dark 180 s.fits). The master library gets the same names.
The session in a file or library name is written the same way in every language, so changing the language of the app never makes a second file for the same master: the name you gave the session, otherwise its night as yyyy-MM-dd (2026-04-20), and for No Date the words No Date. The titles in the progress list, the log and the overview are shown in the language of the app (20 Apr 2026). Renaming a session does not make a saved master or calibration stale; only the next file you save carries the new name.
The session overview
With more than one session the Sessions block between the Checks and the Masters shows a table with a row for every session of lights and for All Sessions: its Lights (filter, number of frames × exposure time), its Flat per filter, its Dark per exposure time and its Bias. A dimmed entry with (All Sessions) is borrowed from All Sessions; an entry with (shared with 21 Apr 2026) is assigned to this session and to the sessions named; a warning mark means lights have no flat assigned to their session or in All Sessions, or the dark is not for that exposure time. The table appears whenever the lights are in more than one session, or a calibration frame is assigned to sessions that leave out the session of the lights.
The overview is the compact summary. A click on an entry opens Sessions and Calibration with that cell marked, and Sessions and Calibration… in the block's header opens it too; there you see every cell of every session at once and assign frames and masters.
With the lights in one session the block stays away, except while the flat of that session has something to decide: lights have no flat of their filter although there are flats of other filters, or you run lights without a flat on purpose. It then has one row, and the menu of its flat entry offers only Run Without Flat and Reset (This Session), since there are no other sessions to assign flats to.
Assigning flats from the overview
Every Flat entry of a session has a menu (the chevron next to it; Sessions and Calibration offers the same choices in a popover) for the flats of its filter, the ones the entry shows or, when the lights have none, all the flats of that filter:
- Sessions is the same menu as in the Frames step: All Sessions, and a check mark per session for the sessions the flats are assigned to. A click adds or removes a session. Use it when one night's flats should serve another night too, or to give a night flats of its own.
- Run Without Flat calibrates these lights without a flat on purpose, even where flats are assigned to them. The entry reads without flat (chosen) and the Checks give a note instead of a warning.
- Reset (This Session) (while the choice is in force) goes back to the automatic choice.
Run Without Flat belongs to the project and counts for the session and filter, also when the lights are in one session only (then the steps, names and cache folders stay as they are, but no master flat is built and the lights are not divided by one); it is ignored for a session that is not in the stack, for instance one you left out. Darks and bias are assigned in the Frames step.
Leaving a session out
Exclude from Stack in the session menu removes a whole session from the run, with its lights and the calibration frames assigned only to it, and from the Checks and the overview. Frames in All Sessions stay, and so do frames that are also assigned to a session you still stack.
Checks, masters from the library, and building masters
- The Checks name the session: Lights (12) of 20 Apr 2026 with filter CL have no flats; darks are compared with the lights of each session on their own, by exposure time and by temperature (Darks were taken at -5 °C, the lights of 20 Apr 2026 at -10 °C), with the same rules as above. A dark that is not for the exposure time of the lights can only be scaled when the bias it is built with exists: the one of its own session, otherwise the one of All Sessions. Flats, darks or bias assigned only to sessions that have no lights are not used and get a note.
- Flats of one filter that were taken on several nights and end up in one master get a note (Flats (24) for filter CL were taken on 2 nights and are merged into one master. Assign them to sessions if they should not be.), so merging them is your decision; with the lights in one session the note leaves out the advice to assign them, which would change nothing. A night counts from noon to noon in the time zone of your Mac.
- The Masters block has a row for every session that needs a master of its own, such as Flat CL · 20 Apr 2026, and each is decided on its own. A decision you made for a flat or dark before sessions existed counts for every session of that set until you decide for one of them.
- Without lights there are no sessions: a run builds one master per filter or exposure time from all frames, and one more for each set of sessions you assigned frames to (Flat CL · 20 Apr 2026 and Flat CL · 21 Apr 2026 are two masters if you assigned the flats to those sessions), and a dark in All Sessions is one.
Sessions and Calibration
The window Sessions and Calibration shows on one page which session gets which flat, dark and bias, and lets you change it right there. It is a sheet over the main window and acts at once, like the context menu of the Frames step: Done only closes it, and there is no Cancel, because every change is an edit of the project that you can take back the same way.
Open it from the Stack step (the Sessions and Calibration… button in the header of the Checks and of the Sessions block, or a click on an entry of the session overview, which opens it with that cell marked), from the sidebar of the Frames step (Sessions and Calibration… under Sessions) or from File → Sessions and Calibration…. While a stack runs, the window can be opened, but its matrix is locked and dimmed, like the Masters block.
The matrix. There is a row for every session of lights, in the order of the Frames step's sidebar, No Date included. A session you left out of the stack stays in it, dimmed and marked Excluded. The columns are the Lights of the session (filter, number of frames × exposure time), a Flat for every filter of the lights, a Dark for every exposure time of the lights and the Bias. With six columns or more the cells scroll sideways, and the session and its lights stay in place.
Frames and Masters. The switch in the header decides what a cell shows. Frames shows the calibration frames the session takes: their number, the day they were taken and where they come from. Masters shows the master that is made from them, named as in the master library (Flat CL · 2026-04-20), or the finished master of the project or the library you chose for that cell.
The legend says what the look of a cell means. The cells differ in brightness and border, not only in color:
| Cell | Meaning |
|---|---|
| Orange, solid thick border | Only this session: frames assigned to this session alone. |
| Blue-green, solid thin border | Shared with other sessions: frames assigned to this session and others; the cell names the others. |
| Grey, a little lighter than the background, solid thin border | All Sessions: the session borrows frames from All Sessions. |
| Red, dashed border | Missing: the lights need a flat, dark or bias, nothing provides it, and the project has frames of that kind that other sessions or filters use. The cell gets a warning mark. |
| Background color, solid thin border | None in project: the project has no frames of that kind at all (a one-shot color camera without bias, say). That is a choice, so the cell shows no warning mark; a finished master can still be chosen for it. |
| Dashed with short dashes | Without flat (chosen): you decided to run these lights without a flat. |
| Darkest, text dimmed | Not needed: the session has no lights of this filter or exposure time. |
A dark that is not for the exposure time of the lights gets a warning mark and says which lights it stands in for.
A click on a cell opens a popover for exactly this session and column:
- Frames: one entry for each set of frames that fits (the flats of this filter, the darks of this exposure time, the bias), with their number, the day and the sessions they are assigned to now. A check mark assigns the set to this session or takes it out again, exactly like Sessions in the Frames step's context menu. Filters are never mixed: a flat column only offers flats of its filter (and a lone set of flats without a filter where a single filter of lights is paired with it, see Sessions). A set the session takes from All Sessions says In use.
- Finished masters of the project and the library that fit the lights: a click uses one for this cell, a click on the master in use takes the choice back; Build from the frames declines finished masters. It is the same decision as Use, Decline and Reset in the Masters block.
- Run Without Flat (flats only), see Assigning flats from the overview.
- Reset (All Sessions) takes this session out of the frames it is assigned to in this cell, so it uses what All Sessions give it, and takes back a choice to run without a flat or a finished master for this cell. Where the frames are shared with other sessions, a line above the button names them: Reset changes their cells and the master choice of that set too, as the context menu does.
With the lights in one session, assigning frames to sessions would change nothing: the popover then lists the frames the cell takes, and only the master choice, Run Without Flat and Reset (All Sessions) act.
A session you left out of the stack only shows its cells: its popover lists what the cell could take, but nothing in it acts, because giving it frames would take them from the sessions that are stacked.
Checks. The column on the right lists the warnings and notes of the Checks that are about the calibration (a dark that does not fit, lights without a flat, flats of several nights in one master, calibration frames of the wrong gain or Bayer pattern). A click on one marks the cells it is about with a ring. Below it the result says what a run would do: 2 stacks (CL, DB) · 7 masters are built · 1 master from the library.
Manage Sessions… in the footer closes this window and opens Manage Sessions on the first marked session — if no cell is marked any more, on the session you came from when you opened the matrix from Manage Sessions — where you rename, merge, exclude and delete the sessions. For VoiceOver every cell reads as session, column, origin and frames, with Warning in front where the cell shows the warning mark.
Manage Sessions
The window Manage Sessions is the one place for the sessions of your lights: it lists them, shows what each one holds and how its lights are calibrated, and renames, merges, excludes and deletes them. It is a sheet over the main window and acts at once, like the session menu of the Frames step and like Sessions and Calibration: Done only closes it, and there is no Cancel. While a stack runs the window can be opened, but its details are locked and dimmed, like the Masters block.
Open it from the Frames step (the Manage Sessions… button under the sessions in the sidebar, or Manage Sessions… at the end of the context menu of a session), from the footer of Sessions and Calibration (which closes and opens on the session marked there) or with File → Manage Sessions…. It opens as soon as a project is open. A project without lights has no sessions yet and the window only offers New Session….
The header says what the project holds: 3 automatic sessions · 1 without date · 133 lights · 9 h 18 min exposure (the exposure of the lights that go into the stack), and how many sessions are left out of the stack. Next to the close button the Time Zone menu sets the zone in which a night runs from noon to noon. It is saved with the project and starts as the time zone of your Mac, so a project opened on a Mac in another zone (or taken along on a trip) keeps its nights. Set it to the zone of the observing site when that is not where your Mac is. Changing it cuts the nights anew: lights move into other nights, while names, exclusions and assignments stay with the dates they were made for, so change it before you name and assign sessions, and Undo takes it back.
The list on the left shows the sessions in the order of the Frames step's sidebar. Each entry has a dot, the title (the name you gave, else the date), the number of lights, and one line with the night (where the title is a name) and the filters with their number and exposure time (CL 36 × 180 s). A session you left out of the stack is dimmed, its title struck through, and carries the mark Excluded in words. Below the list, New Session… asks for a name and makes an empty session; move lights into it in the Frames table.
The details on the right are for the session you chose:
- Name and Night. The field starts with the name you gave; the date is shown in grey where there is no name. A change counts when you press Return or leave the field, and an empty name goes back to the date of a night (a session you made yourself keeps its name). The night shows the date and, from the lights'
DATE-OBS, the time of the first and the last light (20 Apr 2026 · 21:14 – 03:52; first and last are the real first and last moment, and a camera RAW light's time carries a dagger). A span that starts in, ends in or crosses the hour that repeats when the clocks go back names the zone at both ends (02:40 CEST – 02:10 CET). Lights of several nights in a session you made yourself get the dates written out: 20 Apr 2026 21:14 – 21 Apr 2026 23:00. No Date has nothing to change and is only shown. - Four tiles. Lights: all lights of the session, with how many you left out one by one and how many the analysis marked (2 excluded, 1 marked). Exposure: the total of the lights that go into the stack, with the filters. A session you left out of the stack shows its exposure marked Not stacked, and the header does not count it. FWHM (median): the median star width of the lights that were measured, next to the project's median; a dash and Not measured yet until the Analyze step has measured them (the window does not start the measurement). Sensor: the mean sensor temperature of the lights next to the temperature of the darks they get, with the warning mark where one of them differs by more than the Checks allow. Each set of darks counts on its own, as in the checks (or the finished master you chose for it, with its temperature); with several sets the temperatures are listed. No darks where the lights get none.
- Calibration of the Lights. One row for each filter: its lights, the flat, the dark of each exposure time and the bias, each with where its frames come from (Only this session, Shared with other sessions, All Sessions, Missing, None in project), the same cells as in Sessions and Calibration and with the same warning marks. A click on a cell opens that window with the cell marked. The switch Run Without Flat runs the lights of that filter without a flat, the same choice as in the matrix.
- Calibration Frames for This Session. The flats, darks and bias that count for the session: the sets in All Sessions and the ones assigned to it, alone or with other sessions, each with the number of frames, the day or days they were taken (first to last) and where they count (All Sessions, Only this session, Shared with 21 Apr 2026, and (not needed here) where none of the session's lights uses them). Sessions… assigns a set to sessions, exactly like Sessions in the Frames step's context menu. With the lights in one session, and for a session left out of the stack, the button is off, as in the matrix.
- Notes. Free text for the session (Haze after 02:00). It is kept in the project and is handed over when you leave the field or the session. A merge appends the notes of the merged session in front of the other session's, a blank line between them; deleting a session deletes its note.
- Use in Stack. The switch leaves the session out of the stack or puts it back, like Exclude from Stack in the context menu.
The footer. Merge Into… lists the other sessions and moves all frames of this session into the one you choose, with the same rules as the context menu (see Sessions). Delete Session removes a session you made yourself while no light is in it. Automatic sessions come from the lights, so they cannot be deleted; the hint beside the buttons says so.
For VoiceOver every entry of the list reads as title, lights, meta line and Excluded, and a tile or a calibration cell reads with Warning in front where it shows the warning mark.
Finding bad frames
A satellite trail, a passing cloud, trailed stars or a frame taken at dawn spoil a stack. Step 2 Analyze measures every light and marks the ones that stand out against the others of their filter and exposure time, with the reason, so you can leave them out before the run. It is described in Analyze frames. An excluded frame stays in its group and in the project; the table says "Excluded" in its status column, and its context menu offers Include in Stack. Stacking, the checks and the master suggestions leave excluded frames out, and the Stack step counts only the frames that are stacked, with the excluded ones in brackets. The file itself is never changed or deleted, and Save Project keeps the choice.
Checks
The Checks block of the Stack step warns about problems that would hurt the result, from the file headers alone:
- There are no frames at all. Without lights but with darks, flats or bias the checks are different, see Building masters without lights.
- There is no dark with the exposure time of some lights (a difference of up to 1 % is fine). The nearest dark is used instead: with bias frames the master dark is scaled to the light exposure; without them it is subtracted as it is, which only works well for equal exposures. A dark that already has its bias removed (a master dark saved by an earlier run) is always scaled, so it only gets a note. Darks of an exposure time that no light has are not used and only get a note.
- Lights of a filter have no flats, or flats are for a filter that no light has. Flats of different filters may be exposed for very different times; that is no problem. With several sessions this is checked per session, and the message names it.
- The darks of an exposure time were taken at a sensor temperature more than 2 °C away from the lights they calibrate.
- Darks, flats or bias frames were taken at a different gain than the lights. Only gains named in the headers are compared, and they have to be equal. Frames of a DSLR that name an ISO but no gain are compared by their ISO instead, and a gain is never compared with an ISO (see Gain, electron gain and ISO).
- Some frames have a different size or channel count (Mono or RGB) than the first light. They will be skipped.
- Flats or bias frames have a different Bayer pattern than the lights, so their color cells would not line up.
- The lights name no Bayer pattern and none is chosen in the settings, so the result stays mono.
- The disk the project folder is on has less room than the stack needs (a warning), or hardly more (a note, when less than a tenth of the need would be left). The message names the disk, how much the stack needs and how much is free; see Disk space.
Hover over a check to see which files it is about. Frames named by a warning also show a warning mark in the status column of the Frames step, with the message as text and tooltip; "Skipped:" takes precedence there. The mark follows the current checks and is not saved. A green check means nothing was found. Warnings never block the start; they tell you what to expect.
Masters from the project and the library
Masters can live in two places. Every master a stack builds is saved in the masters folder of the project (named after the Master Names, see Settings), and the master library keeps masters for all projects. Both are candidates, and the Masters block says where each one comes from. If one of them holds a master bias, dark or flat that fits your lights, you do not have to build it from frames again. The Masters block shows one row per master the lights need: the Bias, a Dark for each exposure time of the lights (Dark 180 s) and a Flat for each filter (Flat CL). Each row is decided on its own, and it shows what the project does:
- A master from the project or the library. Its name is shown, followed by where it lives: Project (the project's
mastersfolder) or Library. Reset takes the decision back. The run uses this master as it is; the frames of that type in the project are not combined, checked or converted. If the master no longer fits the lights, for example because the project got other lights, a warning says why. - A proposal. If you have not decided, Siderea shows the best fitting master with the reasons it fits (same camera, same gain, exposure time within the limit, and so on). Use assigns it to the project, Decline tells the project to build that type from its own frames and not to ask again.
- Declined. That master is built from the project's frames. Reset brings the proposal back.
- A dash. Neither the project nor the library has a master for these lights (the line says "No master from the project or the library fits" if there are masters that do not fit; hover over it to see why).
Without lights there is nothing to match, so the block is not shown: a run without lights builds every master from the project's frames.
The decision is saved in the project, per row, so Flat CL can come from the library while Flat DB is built from the frames. Projects saved by an older version keep their decision for a type, which then counts for the one set of that type (one filter, one exposure time); with more sets it must be made again. How masters are matched is described under Matching masters. The progress list of a run leaves out the steps for masters that come from the project or the library.
Settings
| Setting | Effect |
|---|---|
| Bayer pattern | From header uses the pattern the camera wrote into the file. Choose RGGB, BGGR, GRBG or GBRG if the header is missing or wrong. |
| Reference frame | The light that all others are aligned onto, whatever their filter. Automatic takes the light with the best score of the Analyze step, from the filter with the most lights; a reference you choose here is used as it is and needs no analysis. |
| Low rejection σ / High rejection σ | How far a pixel value may fall below or rise above the typical value of its stack, in standard deviations, before it is thrown out. Defaults 4 and 3; the upper limit is tighter because satellites, planes and cosmic rays are bright. Smaller values reject more. |
| Normalize frames | Matches background level and contrast of every light to the first one before combining, so frames taken under a brightening or fading sky agree. |
| Rejection map | Also computes an image showing how many frames were rejected at each pixel. After the run, Save Rejection Map… writes it as a FITS file. |
| Hot/cold pixel correction | Replaces single stuck pixels by the median of their same-color neighbours while calibrating. |
| Master Names | Shown whenever the run builds a master: one field for every master it builds (bias, a dark per exposure time, a flat per filter; not the ones a master from the library or the project replaces). The type is added to the name, so a dark becomes 2026-04-20 – Dark 180 s.fits in the project's masters folder (flats: the filter, like … – Flat CL, bias: … – Bias); a master made for one session also gets the session, like … – Flat CL · 2026-04-20 (its name, else its night as yyyy-MM-dd, in every language), with a field of its own; a master made for several sessions gets all of them joined with +, like … – Flat CL · 2026-04-20+2026-04-21. An empty field (or one with nothing but blanks and dots) takes the night the frames of that very master were captured in (the night of the earliest DATE-OBS among them, the same night a session is named after: it runs from local noon to the next local noon in the project's time zone, and for camera RAW frames, whose time has no zone, in UTC), shown in grey, so darks, flats and bias from different nights each get their own date. Flats taken at 20:30 in New York are named after that evening, not after the UTC day that has already begun. Earlier versions of Siderea named a master after the UTC day, so the same master can now get another date: it is saved as a new file next to the old one, and the old file stays until you delete it. Type a name to replace it, for example the target. The same name replaces the master of an earlier run, another name keeps it next to the old one, so you can hold several sets in one project. Exposure times are written with three significant digits (Dark 0.05 s and Dark 0.06 s are two files, and so are Dark 0.0046 s and Dark 0.0054 s; Dark 180 s stays Dark 180 s, and Dark 0.0004 s is not Dark 0 s). Earlier versions of Siderea rounded exposure times to three decimals, so a dark of a very short exposure can now get another name: it is built again and saved as a new file next to the old one, and the old file and the cache of earlier runs stay until you delete them; if two masters of one run would still get the same file name, the second is numbered (… 2.fits) instead of replacing the first. Characters a file name cannot hold on macOS or Windows (/, :, \, *, ?, ", <, >, ` |
| Add new masters to the library | Copies the masters that were built for this run to the master library as well, so other projects can use them. They are always saved in the project's masters folder; this option only adds the library copy. Off by default, because masters are large. Masters that came from the library, and a single master file you put in a group yourself, are not added again. A master is named like 2026-04-20 – Dark 180 s: its entry under Master Names, then the type and the exposure time or filter. Without a name (no typed text and no capture date) the project name takes its place (an unsaved project leaves it out). If adding fails, the log says so and the stack carries on. The choice is saved with the project. |
The settings belong to the project: they are saved in project.siderea (use Save Project), come back when you open the project, and a Bayer pattern or reference frame you chose in one project does not carry over to the next. Projects saved before this keep the defaults. Master names you type are not saved; they belong to the run.
The settings are locked while a run is going. The header of the settings column and of the Masters block says so (Locked while a stack runs.).
Removing satellite and aircraft trails has no setting: it is on for every filter with 3 to 9 lights and off for the others, see Satellite and aircraft trails.
What happens when you start
Siderea works through these steps in order. The Progress panel lists them with a progress bar each, and the log next to it records skipped frames and the masters that were built.
- Analyze. With Reference frame → Automatic, the stack first measures the lights that have no stored measurement yet, with the same stored results as the Analyze step (a light that step is measuring is waited for, not measured twice), and takes the reference frame from the scores. When every light is already measured, the step is finished at once. It does not change your frames, and a marked frame is not left out because of it.
- Master Bias, Master Dark, Master Flat. Each set is combined into one master frame with a sigma-clipped mean: the bias, each exposure time of the darks, each filter of the flats. The master bias is subtracted from the darks and flats first when there are bias frames. A set that is a single file already marked as a master is used as it is. Only the masters the lights need are built.
- Calibrate Lights. Every light has the master dark of its exposure time subtracted and is divided by the master flat of its filter. Then hot and cold pixels are corrected if you left that on. This step runs only when there is a master frame or the pixel correction is on.
- Debayer. Color cameras store one color per pixel. If the lights are mono mosaics and a Bayer pattern is known, they are turned into full RGB images. Lights that are already RGB skip this step.
- Align. Stars are found in every light and matched with the stars of the reference frame, whatever the shift, rotation or small scale difference. Each light is shifted, rotated and resampled onto the reference. With several filters, the reference frame is picked first (see Analyze above) and every filter is aligned onto it. A light with too few matching stars is skipped and named in the log. If that happens to every light of a filter (it shows another patch of sky, say), the filter is left out of the result with a line in the log, and the other filters are stacked as usual. How many stars were found and matched in every light is shown in the Progress panel and in the log, see Alignment results.
- Remove Trails. Satellites and aircraft draw straight, bright streaks across single frames. For every filter with 3 to 9 lights, this step finds the streaks in each aligned light and blanks them in that light only, so the next step ignores them; see Satellite and aircraft trails. A filter with 10 lights or more does not get the step (it is not in the list of steps for that filter), because the sigma clipping of the next step handles trails when there are enough frames; neither does a filter with 1 or 2 lights, where a streak cannot be told from a line that is in every frame.
- Integrate. For every pixel the values of all lights of a filter are combined into a sigma-clipped mean: outliers beyond your rejection limits are dropped, the rest is averaged. Frames are read in strips, so the number of lights is limited by your disk, not by your memory.
Frames that cannot be used are skipped, with the reason in the log, and the run goes on without them. A run stops only when nothing is left. Cancel stops it at the next safe point and removes the step that was running.
Skipped frames are also marked in the project: in the Frames step they show a warning mark and the line "Skipped:" with the reason, so you can find them without reading the log. The marks stay until the next run starts, until you remove the frame, or until you open another project; they are not saved in the project.
Saved steps
Every step keeps its files in the cache folder of the project, in a folder of its own per set (such as master-flat-CL and align-DB), so adding a filter does not invalidate the others. When you stack again, a step is not calculated again if its frames (path, change date and size), its settings and the files of the steps before it are unchanged; the log says "using the saved result". Change a setting, such as the Bayer pattern, and that step and all steps after it run again; the steps before it stay. A step that failed or was cancelled leaves no half-finished files, and the steps before it are kept. A master keeps only the finished master frame in its folder; the calibrated copies of the single darks or flats are deleted as soon as the master is written, since the saved master is all a later run needs. The cache can still take many gigabytes. The Cache block of the Stack step's settings column shows its size, and Clear Cache there deletes the saved steps (not while a run is going). The project, its frames, the undo history of the open image and the measurements of the Analyze step stay.
Disk space
A stack writes a lot: every step that works on the lights writes a copy of each frame into the cache, and the copies get bigger once the color channels come in. A camera with a 6248 × 4176 pixel sensor takes about 100 MB per frame as a Bayer image and about 313 MB per frame after the Debayer step, so 48 lights need around 5 GB to calibrate, 15 GB to debayer and another 15 GB to align.
Before you start, the Stack step estimates this from the file headers alone: for every step that has to run, the frames times width times height times channels times 4 bytes, plus the masters, the copies a master step holds while it is built, and the stack that is saved to the project's results. Steps that the cache supplies (see Saved steps) write nothing and are not counted; a step that runs again first deletes its old folder, so that space counts as free again. The estimate is compared with the free space of the disk the project's cache folder is on. If the disk is too small, the Checks block shows a warning like This stack needs about 36.0 GB of additional disk space on "MyPassport", but only 100 MB are free. If it is just big enough, with less than a tenth to spare, you get a note. In both cases you can free space with Clear Cache or put the project folder on another drive. The warning does not stop you from starting, and it is an estimate: it does not know which frames a step will skip.
If the disk fills up during a run anyway, the run stops at once with No space left on the device while writing …, in the Stack step and in the log. It does not skip frame after frame as unusable. The step that was running is removed again, so the space it took is free, and the steps before it stay in the cache. The same goes for other files that cannot be written: the message now names the reason the system gave.
The result
The integrated image opens on the canvas as a new image window, titled for example Stack · M31 · 48 frames, with an empty history. With lights of several filters every filter opens as an image of its own, with the filter at the end of the title (Stack · M31 · 48 frames · CL). Each result is saved automatically as a FITS file (32-bit float, lossless, with its header) in the results folder of the project, named after the project and the time in UTC (the Z at the end), such as M31-20261027-231500Z.fits; the result of one filter among several carries the filter, such as M31-CL-20261027-231500Z.fits. It is listed in the Results entry of the Frames step, where you can open or delete it. Use step 7 Export to write it as a JPEG, TIFF, PNG, FITS or XISF file; it starts in the export folder of the project. Next to the result Siderea saves a record of the frames that went into it (<result>.frames.json), from which the Export step writes a frame report as a PDF, an HTML page and a CSV.
World coordinates. If the Analyze step has solved the frame the stack was aligned onto, the result carries that frame's world coordinates in its FITS header (and in exports to FITS and XISF), so other programs can show what is in the picture. All lights are aligned onto that one frame and nothing is cropped or scaled, so the coordinates fit the stack exactly; with several filters every filter's stack gets them. The stack takes the stored answer of the Analyze step and never solves by itself: without a solved reference frame, or when the file or the Bayer override changed since it was solved, the stack has no world coordinates and the frame report has no field line. If you chose the reference frame yourself, solve that one.
The Progress panel stays below the overview with the steps and the log (the run log is also saved as a file) until you start the next run or open another project. Next: Linear in the top bar opens step 4 with the first result as the active image; or go back to the Frames step to change your frames and run another stack. If you opened another step while the run was going, the result is already on the canvas when you come back.
A run that ends while another step is open, or while Siderea is in the background, does not go unnoticed: a small mark (a check for a stack that finished, an exclamation mark for one that failed) appears on the number of step 3 until you open the Stack step, and with Siderea in the background the Dock icon bounces once and shows a badge until you come back. The Follow log checkbox above the log stops it from scrolling to each new line while you read.
Alignment results
While the lights are aligned, the Progress panel lists every light under Alignment: the stars found in it, how many of them matched a star of the reference frame, and the outcome (Aligned, Reference, or Not matched for a light that was skipped). Hover over a row for how the light was moved onto the reference: the shift of its center in pixels, the rotation in degrees and the scale. The reference frame is named above the list with its star count and its FWHM (alignment stars). That width is measured on the calibrated frame and only on the round stars the alignment uses, so it differs from the FWHM of the Analyze step, which measures the uncalibrated frame and keeps elongated stars. A light that is skipped for too few stars shows both numbers, so you can see whether the stars were missing in the frame (clouds, defocus) or only did not fit the reference.
The same numbers are in the Stars (aligned) column of the Analyze step, next to Stars, the count of the analysis. The aligned count comes from the last run and stays until the next run starts, the frame is removed or another project is opened. Both columns can be sorted.
Satellite and aircraft trails
A satellite or an aircraft that crosses the field leaves a straight, bright streak in the frame it passes through, and in that frame only. The sigma clipping of the integration throws such a streak out as an outlier, and it does that well from about 10 frames on. With fewer frames the streak pulls the typical value and the spread of its pixels with it, and a faint rest stays in the result. The step Remove Trails closes that gap for 3 to 9 lights:
- What it does. After the lights are aligned, it looks for streaks in every light: straight, long (at least a tenth of the image diagonal) and thin (at least 15 times longer than wide). The pixels of a streak are blanked in that light, as a strip of 1.5 times the measured width plus 2 pixels across, along the lit stretches of the line only, so a trail that crosses part of the frame is blanked there and nowhere else, and two trails that cross are both blanked. A blanked pixel is a pixel without data, which the integration ignores: at that place the result is made of the other lights alone. Where the other lights have no data either, at the empty edge that aligning leaves, nothing is left to fill the place, and a blanked pixel there becomes 0 in the result, as every pixel without data in any light does. Every light is blanked on its own, so a streak in one light never costs anything in the others. The progress bar of the step runs through the lights twice: the first half is the search, the second half the blanking. The search uses the Hough transformation (Duda & Hart, Communications of the ACM 15, 1972) on a reduced copy of the frame, which also lifts faint streaks out of the noise, and measures line and width in the full frame; stars are left out, and a row of stars that only lines up is no trail. For color frames the search uses the mean of the channels, and all channels are blanked.
- When it runs. Automatically, for every filter on its own: with 3 to 9 lights the step runs. From 10 lights on it is left out, because the sigma clipping then does the job; with 1 or 2 lights it is left out because there are too few frames to tell a trail, which is in one frame only, from a line that is in all of them (a diffraction spike, a hot column): with a single light the step would blank every straight line, and where that line is a part of the sky the result would show a black stroke. There is no setting for it in the Stack step. The progress list shows Remove Trails (with the filter when there are several, such as Remove Trails L) only for the filters where it runs, and the run log says for every filter whether it runs and why, in the settings at the top: Trail removal L : on (9 lights, fewer than 10), Trail removal R : off (12 lights, from 10 on the sigma clipping rejects trails) or Trail removal H : off (2 lights, too few to tell a trail from a fixed line). If lights are left out on the way (an alignment that failed) and fewer than 3 remain, the step passes them on unchanged and says so in the log. If it cannot read a single light of a filter, that filter is left out of the result with a line in the log, and the other filters are stacked as usual.
- With the sigma clipping. Both work together. The step takes the streaks out of the frames first; the sigma clipping afterwards still rejects what is left, such as hot pixels, cosmic rays and whatever the step did not find. With 10 lights or more of a filter, the step stays out of the way and the sigma clipping alone is trusted.
- What it leaves alone. A line that other lights show at the same place is not a satellite, which is in one frame only: it is a diffraction spike of a bright star or a hot column. Blanking it in every light would leave a hole in the result, so the step leaves it alone and says so in the log, with the name of your file (light_012.fits: left alone 1 straight line that other frames have at the same place (a diffraction spike, a hot column)), also when the step is taken from the cache. Wide bands, such as a nebula's streak or a comet's tail, are not thin enough to count. A curved or blinking trail (an aircraft with lights) is found piece by piece, as far as the pieces are straight and long enough. A streak that is not visible even in the reduced copy stays where it is, for the sigma clipping to deal with.
- Where to see what it did. The log has a part Remove Trails with a table Trail removal: for every light the number of trails found and blanked and the number of pixels that took, with zeros for a light without a trail, so you can see that the step looked at it, and a note for every light that had lines the step left alone. A light with unusually many blanked pixels is worth a look in the Analyze step.
The step is saved like the others (Saved steps): a second run with the same frames takes it from the cache and the log shows the same table, and a change in the frames or in the steps before it runs it again. Its folder in the cache is remove-trails (with the filter when there are several).
The run log
Every run writes a detailed plain-text log, also one that failed or was cancelled. It is saved in the logs folder of the project as stack-<date>-<time>Z.log, for example stack-20261027-231500Z.log; the time is the start of the run in UTC (the Z), so the name means the same moment on every Mac and the hour that repeats when the clocks go back does not give two runs one name. Times inside the log are local; in that repeated hour they carry the offset. The file is created when the run starts and rewritten whenever a step starts or ends, a frame is skipped or aligned, so a crash or a hang leaves the log up to that point; until the run is over it says Status : Run in progress — last update 23:17:42 at the top. When the run ends, the file holds the complete log. In the Stack step, Show Log opens the log of the last run, also while it is running; File → Show Logs in Finder opens the folder with the logs of all runs. Logs are small and are never deleted by Siderea. This is a technical log in English, whatever language the app is set to, meant for finding out why a stack looks the way it does or for a bug report; the log in the Progress panel is the short version of it. The log contains:
- the run: the Siderea version, the project, the start time and the settings (rejection thresholds, normalization, interpolation, whether the cache is used, which masters are premade and which are built);
- each group of frames (split by filter or exposure time where it falls into several sets) with the number of frames, size, color layout, exposure times, gain, temperature and filter, so you can see at a glance whether the frames fit together;
- each step with its start time, number of frames, duration, and whether it was computed or taken from the saved steps, plus the frames it skipped with the reason and the notes it reported;
- for each alignment the reference (file, stars, FWHM) and a table Star alignment: per frame the stars found, the stars matched with the reference, the shift of the frame's center (dX, dY in pixels), the rotation in degrees, the scale and the status (aligned, reference, not matched). A light that was skipped has its counts and dashes for the transform;
- for each trail removal a table Trail removal: per frame the number of trails found and blanked and the number of pixels that took (a light without a trail has zeros), a note for every light with lines the step left alone, and in the settings at the top a line per filter that says whether the step runs for it, see Satellite and aircraft trails;
- for each calibration the masters it applied (bias, dark, flat), and for the final integration a table Normalization: per frame the scale and offset that matched it to the first frame;
- for each integration (the final one and the one of each master) a table of pixel rejection counts: per frame how many values were thrown away below and above the clipping window, as a number and as a share of the frame's pixels. A frame with a much higher count than the others, such as one with a satellite trail or clouds, stands out immediately;
- the end: whether the run finished, failed (with the error) or was cancelled, the total duration, and for a stack the file in the
resultsfolder.
Building masters without lights
A project that has darks, flats or bias but no lights does not stack: it builds the master frames and stops, one master dark per exposure time and one master flat per filter. This is the way to collect masters, for example a set of flats you took at the end of a night: they land in the masters folder of the project and, if you want, in the master library for all projects.
- The button in the top bar says Build Masters instead of Start Stacking.
- The settings column shows only Master Names and Add new masters to the library. Everything else is about the stack and has no effect; masters from the library or the project play no part either, every master is built from the project's frames.
- The progress list shows only the master steps (and Read RAW Files for camera RAW frames).
- When the run is done, no image window opens. Below the steps, Built masters lists each master with the number of frames it was built from and where it went: saved in the project's
mastersfolder and, if you turned the option on, in library.
The checks compare the frames with each other instead of with the lights. The reference is the bias, because it is subtracted from darks and flats; without bias the flats, otherwise the darks:
- The project has no lights and only finished master files (
MASTER = T, one per set: one flat per filter, one dark per exposure time): there is nothing to build. Siderea says so, and Build Masters stays disabled. - Darks or flats were taken at a different gain than the reference frames.
- Some frames have a different size or channel count than the first reference frame. They will be skipped.
- Flats have a different Bayer pattern than the bias.
Creating a master flat
- Take your flats (and, if you have them, bias frames at the same gain) and put them into a project of their own: File → New Project…, then add the folder in the Frames step. Frames without
IMAGETYPare sorted by folder name, so a folder calledFlatsis enough. - Open step 3 Stack. The Frames block counts the flats and the bias, Lights is 0, and the checks say that this run only builds master frames.
- The master is saved in the
mastersfolder of the project, named after Master Names: the day the flats were taken is already shown in the field, type the target or the filter set instead if you like. Turn on Add new masters to the library as well if other projects should use it. - Click Build Masters. The progress list shows Master Bias and Master Flat.
- Under Built masters you see, for example, Flat L · 20 frames · in library · saved. The file and the library copy are named after the master name, the type and the filter, like 2026-04-20 – Flat L. You find the master in the Project Masters section of the Frames step, and in the Master Library entry if you added it there. Later projects with fitting lights are offered it in the Masters block.
A master dark or bias works the same way; a master dark built over bias frames has the bias removed and can be scaled to other exposure times.